Showing posts with label Random Music References. Show all posts

Wednesday, September 3, 2014

Have it Your Way


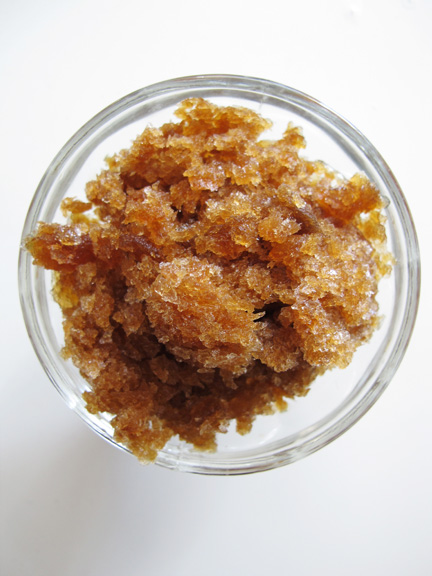
Summer weekends may have come to an end, but it's still hot, hot, hot! I spent most of my summer meal times sipping rosé rather than cooking anything (and is quite evident by my blog posts). I may have had a few cashews on the side for good measure. When it was super hot, I branched out and picked up some fro-yo or made this simple granita. What's great about a granita is that you don't need a fancy ice cream maker or other gigantic contraption, and you can really make any flavor that you want (maybe I should have made a rosé granita). This espresso version gives you a little caffeine jolt alongside the icy cold sensation, so go ahead and have it for breakfast. It's iced coffee weather!


Espresso Granita

2 cups strong hot coffee or espresso
1/3 to 1/2 cup sugar, to taste
1/2 teaspoon pure vanilla extract

1. Stir espresso, 1/2 cup sugar, and vanilla in a medium bowl until the sugar dissolves.

2. Pour into a 9x9x2" metal baking pan and freeze for 1 hour. Stir, mashing any frozen parts with the back of a fork. Cover; freeze until firm, about 2 hours.

3. Using a fork, scrape granita to form icy flakes. The granita can be made 3 days ahead. Cover tightly with foil; keep frozen. Give it a quick scrape before serving.

Tuesday, April 30, 2013

Sun Dried


So I'm a little behind on my Mad Men viewing and blogging as I have been out of town, and will actually be missing in action again next week/end. (When I am occasionally cooking and not blogging, I can usually be found on Instagram as tinanders.) I think my next trip will provide some exceptional food and drink research. At least that is what I am calling it. Stay tuned!  

Anyhoo, my recent travels brought me to Colorado where I have been many times before, but this was my first time to Red Rocks Amphitheatre, probably most recognizable for the U2 Sunday Bloody Sunday video below.


Apparently when the amphitheater is not host to a concert, the venue turns into a personal outdoor gym! #onlyincolorado. I mean...I walked down to the stage and just stood there watching the insanity before me like it was some kind of performance art. It was mesmerizing! Dudes (and chicks) were jumping up the amphitheater seats, then crawling down, then hoisting themselves up the banks along the outskirts then running back down to do a million pull ups...and on and on and on! All at 6400 feet! I was exhausted just watching so adjorned to nearby Morrison for a few margaritas. And now that I am back home without much in the way of food, I scrounged up a few dry ingredients to make this sundried tomato pesto, a great topping on sandwiches, pastas or even eggs. And strangely the color of red rocks. A happy accident!


Sun Dried Tomato Pesto

1 cup drained oil-packed sun-dried tomatoes (about 6 ounces)
1/2 cup grated Romano cheese or Parmesan cheese
1/4 cup chopped fresh basil or 1 tablespoon dried
2 tablespoons pine nuts, toasted
3 garlic cloves
3/4 cup olive oil
3/4 pound linguine pasta


1. Combine sun-dried tomatoes, Romano cheese, basil, pine nuts and garlic in food processor. With machine running, gradually add olive oil and process until smooth paste forms. (Can be made prepared 2 weeks ahead. Cover and refrigerate.)

2. Cook linguine in large pot of boiling salted water until just tender but still firm to bite. Drain, reserving 1/2 cup cooking liquid. Combine 3/4 cup tomato pesto with reserved cooking liquid in same pot. Add linguine and toss over medium-high heat to coat, adding more pesto, if desired. Season to taste with salt and pepper and serve.

Sunday, April 1, 2012

Chardonnay Poulet


I'm not a super big fan of a classic coq au vin, but I did find something intriguing about the coq au vin blanc recipe that ran recently in The New York Times as an accompaniment to an article on Oregon Chardonnays. (That's not a run-on sentence or anything.) The idea of making the recipe with white wine and oyster mushrooms just sounded lighter and more spring-like than the more classically heavy winter dish. Flo Fab left out the pork, but c'mon, how can I not include it, especially when cooking with my partner in crime, Chad?) You can read about some of our other cooking adventures here, here, here and here.) This was one of the tastier recipes that we have made in a long time. Aside from the pain in the neck step of blanching and peeling the pearl onions (maybe you can find them frozen?) it was a pretty straightforward, uncomplicated recipe with outstanding results. (Unlike my photos.) And like last week's Mad Men season premiere, it goes quite nicely with Zou Bisou Bisou.


Coq au Vin Blanc

1 tablespoon grape-seed or canola oil
1 (3 1/2-pound) chicken, in 10 pieces without backbone, dried
Salt and ground white pepper
8 ounces white pearl onions, blanched 3 minutes and peeled
8 ounces pork belly, roughly chopped
1 medium onion, finely chopped
1/4 cup finely chopped celery
4 cloves garlic, sliced
9 ounces oyster mushrooms, trimmed, clumps separated (or mixed wild mushrooms)
1 cup Chardonnay
1 tablespoon lemon juice
2 tablespoons butter (unsalted or black truffle)
1 tablespoon minced tarragon


1. Heat the oil on medium-high in a 4-quart stove top casserole or sauté pan. Add the chicken, skin side down, as many pieces as fit comfortably. Cook until lightly browned, season with salt and pepper and turn to brown the other side. Remove to a platter when browned and repeat with the remaining chicken.


2. Add the pork belly to the casserole and cook until lightly browned, about 8 minutes. Remove to a dish.


3. Add the pearl onions to the casserole and toss in the fat until lightly browned. Remove to a dish. Reduce the heat to low. Add the chopped onion, celery and garlic, cook until softened, about 5 minutes, and then stir in the mushrooms. When the mushrooms wilt, add the wine, increase the heat to medium, bring to a simmer and season with salt, pepper and lemon juice. Return the chicken to the casserole with any accumulated juices, baste, cover and cook for 30 minutes, basting a few more times.


4. Remove the chicken to a platter. Increase the heat to medium-high and cook the sauce and mushrooms about 5 minutes, until the sauce thickens slightly. Lower the heat and add the pearl onions and butter. When the butter melts, check the seasonings, return the chicken to the casserole, baste and simmer for a few minutes. Serve from the casserole or transfer to a deep platter. Scatter the tarragon on top before serving. Makes 4 servings. Serve with crusty bread to dip in the sauce.


Thursday, December 22, 2011

Better Butter Cookie


I finally got my tree up. I mean, between the never ending holiday parties (my soon to be scheduled liver transplant if I don't stop attending), physical therapy and getting myself to work on time, how can I be expected to decorate my home with shubbery in advance of the X to the Mas? Well, after hoisting my one foot wonder onto a cake stand and tuning in to Cameron Crowe's documentary, Pearl Jam Twenty (for the 18th time - just another holiday classic), I got to decorating. (It took more time to wrestle my stash of holiday decor out of my closet than to actually decorate.) And now I'm thinking about reneging on my previous post about not making cookies. Just this once. Sometimes you have to bring something to holiday parties other than another random bottle of 1996 Chateau Talbot Grand Cru Classé Saint - Julien. Am I right? When it comes to cookies, the more butter the better. Dori Greenspan's Sable (aka French butter cookie or Breton biscuit) recipe is the perfect butter cookie. Trust.


Dori Greenspan's Master Recipe for Sables
(from The New York Times)

2 sticks (8 ounces) unsalted butter (preferably high-fat, like Plugra), softened at room temperature
1/2 cup granulated sugar
1/4 cup confectioners' sugar, sifted before measuring
1/2 teaspoon salt, preferably sea salt
2 large egg yolks, preferably at room temperature
2 cups all-purpose flour For the decoration (optional):
1 egg yolk
Crystal or dazzle sugar

1. Working in a mixer fitted with a paddle attachment, beat the butter at medium speed until it is smooth and very creamy. Add the sugars and salt and continue to beat until smooth and velvety, not fluffy and airy, about 1 minute. Reduce the mixer speed to low and beat in 2 egg yolks, again beating until well blended.

2. Turn off the mixer, pour in the flour, drape a kitchen towel over the mixer and pulse the mixer about 5 times at low speed for 1 or 2 seconds each time. Take a peek; if there is still a lot of flour on the surface of the dough, pulse a couple of more times; if not, remove the towel. Continuing at low speed, stir for about 30 seconds more, just until the flour disappears into the dough and the dough looks uniformly moist. If you still have some flour on the bottom of the bowl, stop mixing and use a rubber spatula to work the rest of it into the dough. (The dough will not come together in a ball -- and it shouldn't. You want to work the dough as little as possible. What you're aiming for is a soft, moist, clumpy dough. When pinched, it should feel a little like Play-Doh.)

3. Scrape the dough onto a work surface, gather it into a ball and divide it in half. Shape each piece into a smooth log about 9 inches long (it's easiest to work on a piece of plastic wrap and use the plastic to help form the log). Wrap the logs well and chill them for at least 2 hours. The dough may be kept in the refrigerator for up to 3 days or frozen for up to 2 months.

4. When ready to bake, center a rack in the oven and preheat the oven to 350˚F. Line a baking sheet with a silicone baking mat or parchment paper and keep it at the ready.

5. To decorate the edges of the sables, whisk the egg yolk until smooth. Place one log of chilled dough on a piece of waxed paper and brush it with yolk (the glue), and then sprinkle the entire surface of the log with sugar. Trim the ends of the roll if they are ragged and slice the log into 1/3-inch-thick cookies.

6. Place the rounds on the baking sheet, leaving an inch of space between each cookie, and bake for 17 to 20 minutes, rotating the baking sheet at the halfway point. When properly baked, the cookies will be light brown on the bottom, lightly golden around the edges and pale on top. Let the cookies rest 1 or 2 minutes before carefully lifting them onto a cooling rack with a wide metal spatula. Repeat with the remaining log of dough. (Make sure the sheet is cool before baking each batch.)

Variations
Lemon Sables: Before mixing the butter and sugar together, pour the sugar in a bowl with the grated zest of 1 to 1 1/2 lemons. Work the zest and sugar together with your fingertips until the mixture is moist and aromatic, then cream it with the butter in the mixer.

Parmesan Sables: Replace sugars with 3/4 cup very finely grated Parmesan added to the beaten butter. A few grains of fleur de sel may be gently pressed into the top of each sable before the baking sheet is slipped into the oven.

Monday, September 19, 2011

Eggplant Assemblage


Holy cow. How good does that look?!? Sometimes I totally surprise myself. Thank you Melissa Clark. Thank you The New York Times. Thank you random folder of recipes that I keep even after the invention of this thing called the web. This recipe is delish.

I've been feeling super lame because I haven't been blogging regularly (get ready because that is going to change!) so this past weekend I decided that I wanted to make something simple yet seasonal and I think I hit the nail on the head with this deconstructed eggplant parm by Melissa Clark. It's fresh and flavorful and you don't have to bake it in the oven! There are more steps than I normally endorse, so takes awhile (2 hours if you are talking on the phone at the same time) but it's worth it! You cook the eggplant, cook the sauce, brown the bread crumbs, assemble, and voila...a gorgeous veggie starter.


Eggplant Parmesan Assemblage

1 large eggplant sliced into 1/4-inch-thick rounds
3/4 teaspoon kosher salt, more to taste
Black pepper to taste
About 2/3 cup extra virgin olive oil, more for drizzling
5 garlic cloves
4 cups cherry tomatoes, halved
4 sprigs fresh oregano
3 sprigs fresh basil, plus 5 large leaves
5 tablespoons grated Parmesan
1/4 cup panko bread crumbs
1/3 cup ricotta
2 ounces fresh mozzarella

1. Place the eggplant slices in a colander over a bowl or in the sink. Season with 1/2 teaspoon salt. Let stand for 20 minutes. Drain and pat the slices dry with a paper towel. Season with pepper.

2. Working in batches, heat some of the oil in a large skillet over medium-high heat (you will need about 1/2 cup total for frying, less with a nonstick pan). Add as much eggplant to the skillet as fits comfortably in a single layer. Cook, without moving, until the undersides are dark golden, about 4 minutes; flip and cook 3 to 4 minutes more. Transfer the eggplant to a platter. Repeat with the remaining oil and eggplant.

3. Let the skillet cool for a few minutes. Return it to medium heat and add 3 tablespoons of the oil. Smash and peel 4 garlic cloves and add them to the skillet. Cook until golden and fragrant, about 2 minutes. Add the tomatoes and oregano. Cook, breaking up the tomatoes with the back of a spatula, until the tomatoes start to form a sauce, 15 minutes. Add the basil sprigs and 4 tablespoons of the Parmesan. Simmer 5 minutes longer.

4. While the sauce simmers, in a small skillet over medium heat, warm 1 tablespoon of the oil. Mince 1 garlic clove and add it to the skillet with the bread crumbs. Toast, stirring, until the bread crumbs are just golden, about 2 minutes. Remove from the heat and stir in the 1 remaining tablespoon of Parmesan and a pinch of salt.

5. Arrange the eggplant on a large platter. Spoon dollops of the ricotta over the eggplant and top with the sauce. Scatter the bread crumbs over the sauce. Top with the mozzarella and garnish with torn basil leaves. Drizzle with more oil and serve. Makes 6 to 8 side dish or appetizer servings.

Tuesday, February 15, 2011

Heart Shaped Box


OK so maybe I got caught up watching the Grammys and never bothered to post the actual recipe for my cutesy heart shaped brownies. (I HAD to see what Gaga was wearing in that egg!) But I ate the heart shaped brownies while watching the Grammys. That must count for something, right?

Normally I make cocoa brownies because cocoa is something that I will keep on hand for chocolate emergencies. Bittersweet chocolate has no shelf life when I'm around, and unsweetened chocolate just seems like a tragedy. However, I was getting low on cocoa and found a random hunk of unsweetened chocolate in the back of my cupboard. Fortunately it was actually labeled 'unsweetened' because let me tell you, the only other way to tell is to taste, and that wouldn't have been pretty.

Since I am a hoarder, I was able to find a fabulous brownie recipe in one of my gazillion cookbooks. Bittersweet by Alice Medrich is one of my faves for chocolate. This recipe uses unsweetened chocolate and is not unlike my recipe for cocoa brownies, except that it uses only one bowl. Bonus! The ice water bath at the end seems a bit much for your average brownie, and could probably be skipped, but it does cool them down to an appropriate eating temperature post haste! (Sorry, it just felt right.)

Once cool, I ordinarily start cutting one little brownie square off after the other until my little brownie 'taste' has turned into one gigantic brownie meal. But just for yucks I used a heart shaped cookie cutter to cut out holiday appropriate shapes. (Little brownie hearts are kinda sorta edgy, no?) You could do that too, or just cut them into little squares and try to stuff them into a heart shaped box. From Duane Reade. Gossip Girl? Nirvana? Anyone?


One Bowl Classic Chocolate Brownies
Adapted from Alice Medrich's Bittersweet

8 tablespoons unsalted butter (1 stick)
4 ounces unsweetened chocolate
1 1/4 cups sugar
1 teaspoon vanilla extract
1/4 teaspoon salt
2 cold large eggs
1/2 cup all-purpose flour
2/3 cup lightly toasted walnuts or pecans (optional)

1. Preheat the oven to 400˚F. Line an 8-inch-square metal baking pan with foil or parchment paper so that it extends beyond the pan. (See photo above and below.) In the top of a double boiler (or large non-reactive mixing bowl) set over barely simmering water, or on low power in a microwave, melt the butter and chocolate together. Stir often, and remove from the heat when a few lumps remain. Stir until smooth.


2. Stir in the sugar, vanilla, and salt. Add the eggs one at a time, stirring thoroughly with each addition. Add the flour and stir until very smooth, about 1 minute, until the mixture pulls away from sides of bowl. Add the nuts, if using. Scrape the batter into the prepared pan and bake for 20 minutes.

3. Meanwhile, prepare a water bath. Pour ice water into a large roasting pan to a depth of just less than 1-inch. Remove the pan from the oven and place it in the water bath, being careful not to splash water on the brownies. Let cool completely, then lift out by the foil or parchment, and cut into 1-inch squares (or hearts!). Makes 16 brownies.

Monday, January 3, 2011

Buffalo Stance


I have no resolve, so there'll be no resolutions. Just because I'm trying to eat a few vegetables and it coincides with the new year, it doesn't mean anything...except that I'm trying to offset all of the buffalo and bison that I ate while in Aspen over the holidays. I'm just going to take a little time out from big game...and red meat in general. And maybe some carbs while I'm at it. That's my buffalo stance.

I ran across a roasted zucchini recipe in Food & Wine and it sounded like a pretty good place to start. Even though zucchini isn't a winter vegetable it is available year round, so I figured that I'd try treating it like a winter vegetable by roasting it. Even though zucchini can be cooked quickly in a saute pan without turning on the oven, I discovered that roasting helps it to dry out and brown more quickly...and you don't have to hover over it, moving it around the pan to help the liquid evaporate. Throw on a glob of ricotta and call it a day. Or, if that's too side-dishy for you, boil some pasta and toss it all together and serve with some Parm on top. Not everyone is calorie counting in the new year...I finished off my veg fest with a hunk of dark chocolate.


Roasted Zucchini with Ricotta
(Adapted from Food & Wine)

6 medium zucchini (2 pounds), diced
2 tablespoons extra-virgin olive oil, plus more for drizzling
Kosher salt
Freshly ground black pepper
3 whole garlic cloves, crushed
1 teaspoon dried oregano
1/4 teaspoon crushed red pepper flakes
2 teaspoons fresh lemon juice
Fresh ricotta, for serving
Chopped parsley, for garnish

1. Preheat the oven to 425°. On a rimmed baking sheet, drizzle the diced zucchini with the 2 tablespoons of olive oil, season with salt and black pepper, and toss with the garlic, oregano, and red pepper flakes. Spread out evenly on the baking sheet and roast for about 20 minutes, until the zucchini pieces are browned around the edges.

2. Transfer the cooked zucchini to a bowl. Toss with the lemon juice and season with salt to taste. Serve with the ricotta, a drizzle of olive oil, and garnish with the parsley. Serves 4.

Friday, June 25, 2010

The Art of Sabrage


Mmmm...wine.

Have you ever seen anyone saber a bottle of Champagne before (it's the noble art of sabrage to you Francophiles out there)? In person? Me neither. That was the WOWW moment at a food and wine event I attended last week at Bouley to help launch a new DVD series called The Everyday Guide to Wine. Towards the end of the night our host, Master of Wine Jennifer Simonetti-Bryan, grabbed a jeroboam of Champagne and her trusty saber, and in one fell swoop sliced off the top of the bottle. It was pretty rad. Why don't I have a trusty saber??? Probably because sabering a bottle of Champagne can be really dangerous if you don't know what you're doing. By the way, a jeroboam is a 3 liter bottle of Champagne (aka a Double Magnum) or in layman's terms, a bottle containing the equivalent of 4 standard sized bottles of bubbly. In other words, it's a big ass bottle. Wait a second. Now that I think about it, we never actually drank from that giant bottle. Where did it go?!? Did the staff drink it? Maybe there wasn't actually anything in it. Hmmm...


Duck!

Anyhoo, The Teaching Company recently published this new educational DVD, a series of 24 half-hour lectures about wine, one of hundreds of courses available through The Great Courses. Looking through the syllabus, it's not unlike how my WSET advanced certification class at the International Wine Center was structured, but without the anxiety of a final exam or the price tag of a 16 week course. And you can go at your own pace, inviting friends over to "study" together.

The Teaching Company put on a great event at Bouley where, aside from the sabrage, we were treated to a four course food and wine tasting. I had never been to Bouley before so when I walked in, the vaulted ceilings made me feel like I was in a wine cave. It was the perfect venue.


The Cave aka Bouley.

The tasting evolved in typical fashion from light to full bodied wines, a Sauvignon Blanc to a Cabernet Sauvignon, paired with complimentary foods. You can see from the menu below what we tasted, in addition to roasted Long Island duckling with spring garlic and almond broth which was paired with the Pinot Noir, and a 2007 Caymus Cabernet Sauvignon which was paired with a dry aged prime beef, glazed bone marrow, and red wine sweet onions (both dishes cut off from my menu photo). Delish. Everything was delish.


The tasting menu...at least part of it.


Last bite of the skate. The fish, not the winter sporting good.

I'll never be able to cook like David Bouley or be a super taster like Jennifer Simonetti-Bryan, but I'm pretty confident that I could put together a decent meal with complimentary wines. At least I'm pretty sure my buds wouldn't say no if I invited them over for food and drink. And with The Everyday Guide to Wine I'll have a great point of reference for my future wine endeavors. But only wine endeavors that don't include a saber. For that I'll just have to stick to DVDs of Star Wars and light sabers.


Red red wiiiiiiine. Thank you, UB40. That song will never leave my head.

Monday, June 21, 2010

Oh Sookie


Chilled carbonated blood with a citrusy finish. Warm blood bisque infused with rose petals. Blood gelato. (My post has nothing to do with Snoop D-O-Double-G. I just like the title of his latest music video.) True Blood is stepping up their culinary game and I'm still on cruise control. If this were Top Chef, I'd be packing my knives. But at least now I'm inspired for next week. (Hey Mario! Blood gelato! I've never seen that on the menu at Otto.) In the meantime, enjoy my True Blood red pepper pasta with lots of garlic or a little, depending on whether you are trying to attract Eric or repel him. I know that I for one will be reducing my garlic intake.


Red Pepper Rigatoni

(Adapted from Marcella Hazan)

2 large red bell peppers
2 tablespoons extra virgin olive oil
2 - 4 peeled garlic cloves
1/8 teaspoon crushed red pepper flakes, optional
Salt
1/2 pound dried pasta (such as rigatoni)
2 tablespoons unsalted butter
1/2 cup freshly grated Parmesan cheese
Fresh basil leaves, torn into small pieces

1. Cut the peppers in half lengthwise and discard the seeds, pulpy core, and stems. Peel the peppers with a vegetable peeler and then cut lengthwise into strips about 1/2-inch wide, then cut crosswise into 2-inch strips.

2. Place a large saute pan over medium-high heat and add the olive oil and 4 garlic cloves. Cook until the garlic is golden brown, 3-4 minutes, then remove and discard it. (Alternatively, mince 2 garlic cloves and add after step 3.)

3. Add the peppers to the hot pan and cook, stirring frequently until soft, about 15 minutes. Add the minced garlic and red pepper flakes, if using, and cook for 2 minutes. Add salt to taste, stir, and then turn off the heat.

4. Meanwhile, bring a large pot of salted water to a boil. Add the pasta and cook according to package directions, until al dente. Gently reheat the peppers and then add the drained pasta, butter, and cheese. Remove from the heat and toss with the basil. Serve immediately. Serves 2 generously.


Thursday, July 16, 2009

Sour Grapes (or Cherries)

Sour Grapes!
You leave such a bad taste.
Sour grapes!
I don't need you anyways!
I love that song. It might date me but I don't care. That song solidified my decision to buy a mountain bike while I was in college. I notoriously comparison shop until no more comparisons can be done. When it came down to the final decision on my Trek, all the bike dude had to say was, "The color's Sour Grape." Umm...Sold!!!

Basically, I like everything sour, not just my bikes or music. I guess a sour grape would technically be a raisin, but I hate raisins. Sour cherries on the other hand...amazing! Fresh sour cherries have a very short season so might I suggest, dried sour cherries. And might I suggest stirring them into your baked goods.

With all of the weekend trips that people take during the summer, one tends to need hostess gift ideas (if you are a thoughtful guest!). I think that fresh baked scones make an amazing hostess gift. The thing is, these scones taste best the day of, so if you make them the day before, just pop them into a 350˚F oven for 5 - 10 minutes just before you serve them so that they can warm up and crisp up. OR...you can just wake up a few minutes before your hosts and whip them up fresh for everyone. They don't take very long to throw together and your hosts will be SO impressed!


This is a classic cream scone recipe. I used the recipe from The New Best Recipe for this batch, but The Joy of Cooking has an almost identical recipe which is equally good. Regardless, you shouldn't be frightened of making scones. You don't need a rolling pin or any special tools. And they don't have to look perfect. Irregular shapes and craggy edges are what make scones unique. I originally made these to enjoy during Breakfast at Wimbledon. I hope you enjoy them!


Sour Cherry Cream Scones
(Adapted from The Best New Recipe)

2 cups all-purpose flour
1 tablespoon baking powder
3 tablespoons sugar
1/2 teaspoon salt
5 tablespoons cold unsalted butter, cut into small pieces
1/2 cup dried sour cherries, roughly chopped (or other dried fruit)
1 cup plus 2 tablespoons heavy cream
Sugar

1. Heat the oven to 425˚F.

2. In a large bowl, whisk together the flour, baking powder, sugar, and salt.

3. Use two knives, a pastry blender, or your fingertips, and quickly cut in the butter until the mixture resembles coarse meal, with a few slightly larger butter lumps. Add the dried cherries and mix just to combine.

4. Stir in 1 cup of heavy cream with a rubber spatula or fork until the dough begins to form.

5. Transfer the dough, and all dry flour bits, to a countertop and knead the dough by hand just until it comes together into a rough, slightly sticky ball. Pat the dough on a lightly floured surface into a 3/4-inch thick circle (about 8-inches round). Cut the dough into 8 wedges. Brush the tops with the 2 tablespoons of heavy cream. Sprinkle lightly with sugar. Place the wedges on an ungreased baking sheet.

6. Bake until the scone tops are light brown, 12 - 15 minutes. Cool on a wire rack for at least 10 minutes. Serve warm or at room temperature.