Showing posts with label Dessert. Show all posts

Sunday, July 10, 2016

Grand Slam #Cake


Remember me? The extremely occasional cook? I've clearly taken a break. Occasions have come and gone and I've just been...lazy apparently. I do have quite a stockpile of recipes that I plan to unroll over the next few weeks. I got inspired by my friend's 13 yo daughter and her friends playing Top Chef with my recipes on a recent  Saturday afternoon. Let's see what actually happens!

Once again breakfast at Wimbledon has come and gone and the American ladies have come out on top. Congrats to Serena on her 22nd grand slam title and to both her and Venus on their doubles win! And of course kudos to Andy Murray on his second Wimbledon title. Truth be told I can't really play tennis but thanks to the generosity of a friend, I have taken a few lessons so that I can at least hit the ball over the net. Most of the time.

As a nod to the British hosts and American players, I made a version of the classic Wimbledon treat, strawberries and cream. I didn't make a shortcake this time but a classic pound cake or #cake or £cake...whatever. (Mine weighed in at a voluptuous 3.5 pounds!) A pound cake is as delish for breakfast as for dessert and though I seriously need to stay away from all things butter and sugar, I made it anyway. Office mates, save room for breakfast tomorrow!


Classic Pound Cake
Adapted from King Arthur Flour

1 cup (16 tablespoons) unsalted butter, at room temperature
1 cup granulated sugar
4 large eggs, at room temperature
2 cups unbleached all-purpose flour
1 1/2 teaspoons baking powder
1 teaspoon salt
1/2 cup milk
1 teaspoon vanilla extract (or extract flavoring of your choice)

1. Preheat the oven to 350°F. Lightly grease a 9" x 5" loaf pan.

2. In a large bowl, or in the bowl of a stand mixer, beat the butter until very light.

3. Beat in the sugar gradually and then the eggs, one by one. Scrape the bottom and sides of the bowl, and beat until the mixture is very light and fluffy.

4. In a separate bowl, whisk together the flour, baking powder, and salt.

5. In another small bowl, whisk together the milk and extract.

6. Alternately add the wet and dry ingredients to the butter mixture, starting and ending with the flour. Stir to combine after each addition.

7. Pour the batter into the prepared pan, smoothing the top.

8. Bake the cake for 60 - 65 minutes, until it springs back when pressed lightly in on top, and a long toothpick or cake tester inserted into the center comes out clean. If the cake appears to be browning too quickly, tent it with foil for the final 15 minutes of baking.

9. Remove the cake from the oven, and loosen its edges. Wait 5 minutes, then carefully turn it out of the pan onto a rack to cool. Store, wrapped in plastic, for a day or two before serving. Wrap well and freeze for longer storage. Makes 1 loaf cake, about 18 servings.


Wednesday, September 3, 2014

Have it Your Way


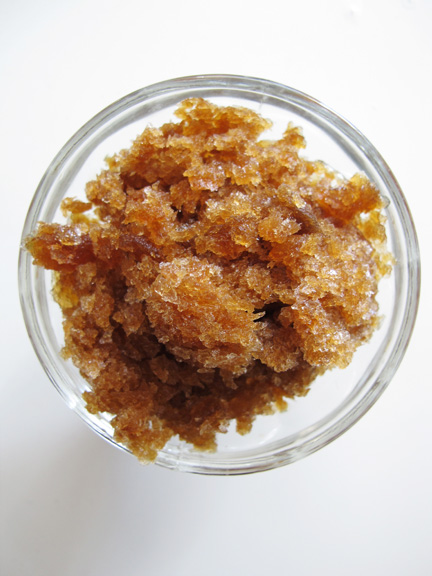
Summer weekends may have come to an end, but it's still hot, hot, hot! I spent most of my summer meal times sipping rosé rather than cooking anything (and is quite evident by my blog posts). I may have had a few cashews on the side for good measure. When it was super hot, I branched out and picked up some fro-yo or made this simple granita. What's great about a granita is that you don't need a fancy ice cream maker or other gigantic contraption, and you can really make any flavor that you want (maybe I should have made a rosé granita). This espresso version gives you a little caffeine jolt alongside the icy cold sensation, so go ahead and have it for breakfast. It's iced coffee weather!


Espresso Granita

2 cups strong hot coffee or espresso
1/3 to 1/2 cup sugar, to taste
1/2 teaspoon pure vanilla extract

1. Stir espresso, 1/2 cup sugar, and vanilla in a medium bowl until the sugar dissolves.

2. Pour into a 9x9x2" metal baking pan and freeze for 1 hour. Stir, mashing any frozen parts with the back of a fork. Cover; freeze until firm, about 2 hours.

3. Using a fork, scrape granita to form icy flakes. The granita can be made 3 days ahead. Cover tightly with foil; keep frozen. Give it a quick scrape before serving.

Sunday, April 20, 2014

Let Them Eat Cake

It's a gorgeous Easter Sunday in NYC and I still have yet to find an abundance of spring veggies. Maybe I'm not shopping at the right places? Fine. Who needs vegetables anyway? Let's forget healthy living for a minute and just bake! 

I decided to make a dessert using only ingredients that I already had on hand, but didn't want it to be super boring looking. Hellooo, 1950s! I unearthed my bundt pan (that I've had for years but never used) to put to use for the first time.  If you don't have a bundt pan, you could swap in 2 regular (8-inch) cake pans or 1 (9x13) baking pan, but just check for doneness earlier in the baking process.

This is a very simple cake recipe, but I recommend using a stand mixer if you can. (There's no reason to exert yourself!) The cake is light in texture and sweetness so is perfect as a spring dessert. Or for breakfast. Or lunch. Or tea time. Or Mad Men viewing. You get the picture. Having a hard time hanging with the relatives? Forgot to file your taxes? Just eat cake! 

Lemon Bundt Cake
Adapted from King Arthur Flour

Cake
1 cup unsalted butter, softened
2 cups sugar
1 teaspoon salt
4 large eggs
2 teaspoons baking powder
3 cups unbleached all-purpose flour
1 cup whole milk
Finely grated zest of 2 lemons

Glaze
1/3 cup freshly squeezed lemon juice
3/4 cup sugar


1. Preheat the oven to 350°F. Lightly grease a 10" tube pan, or a 9" to 10", 9- to 10-cup capacity bundt-style pan.

2. Beat together the butter, sugar, and salt, until light and fluffy. Add the eggs one at a time, beating well after each addition.

3. Add the baking powder, then add the flour alternating with the milk, starting and ending with the flour. Mix until smooth. Stir in the grated lemon zest.

4. Spoon the batter into the prepared pan, smoothing the top with a spatula. Bake the cake for 50 to 55 minutes, or until a cake tester inserted into the center comes out clean.

5. While the cake is baking, make the glaze by stirring together the lemon juice and sugar in a small bowl. Set aside.

6. Remove the cake from the oven, and set it on a rack. After 5 minutes, run a knife around the edge of the pan to loosen, and turn the cake out onto a rack.

7. Poke the hot cake all over with a cake tester or toothpick. Stir the glaze to combine, and immediately brush it on the hot cake. Let it sink in, then brush on more glaze, continuing until all the glaze is used up. Allow the cake to cool before slicing. Serves 16.

Sunday, December 29, 2013

Hey, Blondie!


My quick go-to recipe for a sweet treat is always brownies. Always. You can't beat a warm brownie right out of the oven. Maybe with a little vanilla ice cream? But for the same amount of ingredients (if you don't count the nuts and chips), you can make blondies, essentially a quicker version of chocolate chip cookies but with a richer butterscotch flavor. Try it. I bake a lot and was recently told that it was the best thing I ever made. I'm not so sure about that, but I'll take it!


Blondies with Chocolate Chips and Walnuts
Adapted from Martha Stewart

8 tablespoons (1 stick) unsalted butter, melted, plus more for pan
1/2 cup packed light-brown sugar
1/3 cup granulated sugar
1 large egg
1 teaspoon pure vanilla extract
1 cup all-purpose flour, (spooned and leveled)
1 teaspoon salt
1 cup semisweet chocolate chips
1 cup chopped walnuts

1. Preheat the oven to 350˚F. Brush an 8-inch square baking pan with butter.

2. In a large bowl, whisk the butter and sugars until smooth. Whisk in the egg and vanilla. Add the flour and salt. Mix just until moistened (do not overmix). Fold in 1/2 cup each chocolate chips and walnuts. Transfer batter to prepared pan; smooth the top. Sprinkle with remaining chocolate chips and walnuts.

3. Bake until the top is golden brown and a toothpick inserted into the center comes out clean, 40 to 45 minutes. Set pan on a wire rack, and let cool completely. Using parchment overhang, lift cake from pan and transfer to a cutting board; cut into 16 squares. Store in an airtight container up to 2 days.

Tuesday, December 24, 2013

A Christmas Story


It's Christmas Eve ya'll! Time to get ready for 24 hours of A Christmas Story! TBS gives us all a gift that we don't have to wait until Christmas morning to open, starting at 8:00 pm tonight. And BTW, did you know that you can even visit Ralphie's house?!? You're welcome. Since I won't be in Cleveland to experience it in person, I will be hunkered down in front of my TV laughing at Ralphie dressed as a deranged Easter Bunny, scarfing down the last of my holiday cookies (not soap!).

If you need a last minute cookie recipe, try these oatmeal lace cookies, one of my mom's faves. They're great because you don't need that many ingredients and you can whip them up in, like, 15 minutes (including baking time). You'll end up with an impressive crisp, delicious cookie that may also be quite fragile. FRA-GEE-LAY. Must be Italian.


Oatmeal Lace Cookies

1 egg, lightly beaten
1 cup old-fashioned rolled oats
1 cup sugar
1/4 cup butter, melted
2 teaspoons vanilla
2 tablespoons + 1 teaspoon all-purpose flour
3/4 teaspoon salt
1/4 teaspoon baking powder

1. Preheat the oven to 375˚ F. Add all of the ingredients to a large bowl. Stir to combine.

2. Cover a baking sheet with parchment paper (or a silicone baking mat). Drop the batter, one scant teaspoon at a time, leaving 3 inches between cookies. Bake for 5 - 7 minutes until golden brown. Cool completely before removing from sheets. Makes 24 cookies.

Sunday, November 17, 2013

Apple Expectations


How is November halfway over?? It's going to be Christmas in one second so...time to start baking!

I've been flipping through magazines trying to get some new ideas for Thanksgiving desserts. I've made all sorts of pies in the past, but the truth is that I have to produce an apple crisp or I will be asked to leave dinner! For realz. (These peeps expect a crisp or a crumble at each and every dinner that I attend. Holiday or not.) I was just thinking that maybe I could jazz it up somehow? Like with cranberries? I like the tartness that they add, but not sure if my dinner crowd will approve. I think that they may be apple crisp purists. Or just happy to get whatever I make? I'll go with that. I made a mini version today, essentially a half batch, and I was totes happy. (Just wish I had some ice cream or whipped cream.) We'll what I can get away with!


Apple-Cranberry Crisp

Topping
1 cup (packed) golden brown sugar
1 cup old-fashioned oats
3/4 cup all-purpose flour
1/4 teaspoon salt
1/2 cup (1 stick) chilled unsalted butter, cut into pieces

Filling
1 (12-ounce) package fresh cranberries
2 1/2 pounds Fuji or Rome or Granny Smith apples (or a mix - about 6 medium), peeled, cored, cut into 1/2-inch chunks
3/4 cup sugar
3 tablespoons all-purpose flour
1/2 teaspoon cinnamon

Vanilla ice cream


1. For the topping: Combine brown sugar, oats, flour, and salt in large bowl. Stir to blend. Add the butter and rub in with fingertips until the mixture comes together in clumps. Cover and chill while preparing the filling. (The topping can be prepared 1 day ahead. Keep chilled.)


2. For the filling: Preheat the oven to 375°F. Generously butter a 13x9x2-inch glass or ceramic baking dish. Combine the cranberries, apples, sugar, flour and cinnamon in a large bowl. Transfer the filling to the prepared dish. Sprinkle the topping over the fruit mixture.


3. Bake the crisp until the filling bubbles and the topping is crisp and deep golden brown, about 40 minutes. Let cool 10 minutes. Serve with ice cream, if desired. Makes 8 - 10 servings. 


Monday, September 16, 2013

Just Serve Wine


The great thing about having a dinner party is that you can try out new recipes on your friends. The bad thing about having a dinner party is trying out new recipes on your friends. Sometimes things don't quite go according to plan, so it can be kind of a risk. Unless you ply them with loads of wine. My friend, Chad, hosted a dinner party this weekend and I offered to make a dessert. (It sounded like wine was covered.) And I wanted an excuse to bake!

I actually thought that I had blogged about a flourless chocolate cake previously, but according to my own hi-tech blog search, I hadn't. Unless I forgot to label that particular post, which is not outside the realm of possibility. (Sometimes I blog under the influence. It happens.) 

Since this is an awesomely abbreviated four-ingredient recipe (i.e uncomplicated) and because I knew that we were having pasta for dinner, it seemed like this gluten-free solution (but not calorie free let's not forget!) was the way to go. Overall I would say that it was successful, though I wish that I had made and served a whipped cream alongside it, as I discovered after the first taste that my cake was slightly on the dry side. Slightly. I think I left it in the oven for, like, 8 minutes too long. Being the spazz that I am and since I had the tools, I made another cake the following day just to check. A few less minutes in the oven resulted in a much smoother result. Yay!! And also, Sorry dinner-party-friends!! I didn't know!! So, I guess the moral of the story is, if you want to impress, do a trial run, if you don't have the time, serve wine!


Flourless Chocolate Cake
Adapted from Martha Stewart


5 tablespoons unsalted butter, plus more for the pan
6 ounces bittersweet chocolate, finely chopped
6 large eggs, separated
1/2 cup granulated sugar
Confectioners' sugar, for dusting
Sweetened whipped cream, for serving

1. Preheat the oven to 300˚F with the rack in the center. Butter the bottom and sides of a 9-inch springform pan and line the bottom with buttered parchment paper. Set aside.


2. Melt the butter and chocolate, stirring until smooth, in a large bowl set over a saucepan of simmering water until completely melted. Let cool slightly. Whisk in the egg yolks.


3. In another large bowl, beat the egg whites until soft peaks form. Gradually add the granulated sugar and continue beating until glossy stiff peaks form. Whisk 1/4 of the egg whites into the chocolate mixture then, gently, fold in the remaining egg whites in 2 additions.


4. Pour the batter into the prepared pan, and smooth the top. Bake until the cake pulls away from the sides of the pan and is set in the center, 40 to 50 minutes. (My cake actually didn't pull away from the sides until it was cooling, hence my slightly overcooked trail run. So don't wait for that to happen.) Cool completely on a wire rack; remove the sides of the pan. Serve at room temperature, dusted with confectioners' sugar. Serve with whipped cream, if desired.


Sunday, August 11, 2013

Breaking Back!


Calling all chem nerds and meth heads, can you believe Breaking Bad is finally back tonight?? And...I actually have a blog post? Yeah, yeah, yeah... it's been a month. But I haven't been cooking at all and have only baked (desserts!) a few times at my friend's house out at the beach. Truth be told, I'm still not cooking. And I'm definitely not cooking meth like Jesse and Walt (or Mr. White as Jesse stills calls him). BTW Did anyone happen to catch this interview with chemistry prof, Dr. Donna Nelson?  It's awesome. She has been volunteering as the show's science advisor since season two, after she had read an interview that show creator Vince Gilligan gave to Chemical & Engineering News and reached out to him directly to offer some assistance. Badass.

I haven't taken chemistry since high school (when I felt like the science advisor to many of my classmates) but I think it's not a total stretch to say that there is some chemistry involved in cooking and baking. Baking especially. OK whatever. I think these fudgsicles are the perfect summer meal (I'm serious) when it's 90 plus degrees and 80% humidity. Or if you are Walter White and live in the southwest year round. Gah! I can't wait for tonight's ep! I might have to spend the next 7 hours watching AMC's BB marathon and eating fudgsicles in preparation.


Sicilian Chocolate Gelato Fudgsicles
Adapted from Bittersweet

3 cups whole milk
2/3 cup sugar
3/4 cup premium unsweetened cocoa powder
1 1/2 tablespoons cornstarch


1. In a medium saucepan, bring 2 cups of the milk to a simmer over medium heat.

2. Meanwhile, whisk the remaining 1 cup milk with the sugar, cocoa and cornstarch in a small bowl. Scrape the cocoa mixture into the hot milk. Cook. stirring constantly until the mixture thickens abd bubbles a little at the edges. Then boil gently, stirring for 2 minutes longer. Scrape into a large bowl and let cool completely.

3. Pour into ice pop molds and freeze until firm. Makes 8 - 10 fudgsicles.

Sunday, July 14, 2013

Poppin' Bottles


It just so happens that I made a decidedly French dessert before I realized that it was Bastille Day today. Oo la la! I'm so tuned in. Pop some bottles for the French!

Bastille Day aka French National Day aka La Fête Nationale commemorates the storming of the Bastille (prison/fortress), which took place on July 14, 1789 and marked the beginning of the French Revolution, the end of absolute monarchy and the birth of the sovereign Nation. It became an official public holiday in 1880.

Clafoutis is a baked French dessert from the Limousin region, traditionally made with black cherries, arranged in a buttered dish and covered with a thick flan-like batter. It is then dusted with powdered sugar and served lukewarm. If you can make pancake batter, you can make this. Trust. I used raspberries because it's what I had, but really any seasonal and semi-soft fruit would work. Happy Bastille Day and enjoy this list of French-ified moments in pop culture!


Raspberry Clafoutis
Adapted from Food &Wine

1/2 cup all-purpose flour
1/4 cup plus 2 tablespoons sugar
Salt
3 large eggs
3 tablespoons unsalted butter, melted
Finely grated zest of 1 lemon
1/4 cup plus 2 tablespoons milk
1 1/2 pints raspberries (3 cups)
Confectioners' sugar, for dusting

1. Preheat the oven to 350°F. Butter a 9-inch gratin dish. In a bowl, whisk the flour, sugar and a pinch of salt. Whisk in the eggs, butter and lemon zest until smooth. Add the milk and whisk until light and very smooth, about 3 minutes. Pour the batter into the gratin dish and top with the raspberries.

2. Bake for about 30 minutes, until the clafoutis is set and golden. (It will puff up around the edges.)  Let cool slightly. Dust with confectioners' sugar, cut into wedges and serve. Serves 6.

Tuesday, June 25, 2013

Key (Lime) Party


After my red chile powder consumption in New Mexico (no, not by the tablespoon like stupid kids force feeding themselves cinnamon - but it does kind of sound like a new, old disease...) all I really want is a nice cold margarita. Or key lime pie. Totes, right? For some reason I had been thinking about making a key lime pie for WEEKS. I finally gave in and went out to buy the necessary ingredients. Where did all of the key limes go?!? There are usually a ton o' bags hanging around the produce section of Whole Foods, but unless my eyes were failing me, they didn't have any. Jerks. Fortunately for me Nellie & Joe's Famous Key West Lime Juice was in stock. It's just as well because squeezing enough juice out of a bunch of tiny key limes can get old real fast. Key limes (aka Mexican limes) the namesake of the Florida Keys, are the smaller, yellower, seedier cousin of the common Persian lime and make for a tangier pie filling, though I didn't conduct a proper experiment. I'm just making assumptions. But that gives me an idea...


Key Lime Pie
Adapted from Martha Stewart

1 1/2 cups graham-cracker crumbs
6 tablespoons unsalted butter, melted and cooled
5 tablespoons sugar
1 can (14 ounces) sweetened condensed milk
4 large egg yolks
1/2 cup freshly squeezed key-lime juice
1 tablespoon grated Key lime zest, plus more for garnish
1 1/2 cups heavy cream, chilled

Image and video hosting by TinyPic

1. Heat the oven to 375˚F. Combine the graham-cracker crumbs, butter, and 3 tablespoons sugar in a medium bowl. Mix well. Press into a 9-inch pie plate, and bake until lightly browned, about 12 minutes. Remove from the oven, and transfer to a wire rack until completely cooled.

2. Lower the oven to 325˚F. In a medium bowl, gently whisk together the condensed milk, egg yolks, Key lime juice, and zest. Pour into the prepared, cooled crust.

3. Return the pie to the oven, and bake until the center is set but still quivers when the pan is nudged, 15 to 17 minutes. Let cool completely on a wire rack.

4. Shortly before serving, combine the cream with the remaining 2 tablespoons of sugar in the bowl of an electric mixer fitted with a whisk attachment. Whisk on medium speed until soft peaks form, 2 to 3 minutes. Spoon over cooled pie and garnish with zest. Serve immediately.

Monday, June 3, 2013

Sour!

With the crap weather that we (in the northeast) experienced over Memorial Day weekend, my activities were limited–shopping, movie watching, baking, cocktail making... And because my assistant bakers have grown tired of making regular old cookies (BOOORRRRING!), we invested our time and energy into a multi-layer cake recipe (after a lengthy process of elimination) that even called for cake flour, a very fine, low-protein flour that yields a more tender cake crumb. (Ignore the larger holes pictured–that is more likely the result of snacking than actual cake texture.) (Also please ignore my photo quality. Forgot my real camera yet again!) Personally I questioned the potential success of a frosting made entirely of chocolate and sour cream, but I kept those doubts to myself. I totally expected it to break and to be generally disgusting, but when you think about it, it's not unlike making a ganache. And the addition of the white chocolate chips was our improvisational approach to cake decorating. The results? Perfection. Nearly. The assistant bakers' mom has requested it as her annual birthday cake and another weekend guest immediately asked for the recipe. Success!

Golden Cake with Chocolate Sour Cream Frosting
Adapted from Gourmet

3 1/2 cups cake flour (not self-rising)
1 tablespoon baking powder
3/4 teaspoon baking soda
1 teaspoon salt
2 sticks (1 cup) unsalted butter, softened
2 cups sugar
4 large eggs at room temperature
2 teaspoons vanilla
2 cups sour cream

Frosting
1 1/4 pounds fine-quality milk chocolate, finely chopped
10 ounces fine-quality semisweet chocolate, finely chopped
3 cups sour cream
2 teaspoons vanilla


1. For the cakes: Preheat the oven to 350°F. Butter 2 (9- x 2-inch) round cake pans and line the bottoms of each with rounds of wax or parchment paper. Butter paper and dust pans with flour, knocking out excess. (Also works eliminating parchment, and buttering pans directly and dusting with flour.)

2. Sift together the flour, baking powder, baking soda, and salt.

3. Beat together the butter and sugar in a large bowl with an electric mixer until light and fluffy. Add eggs 1 at a time, beating well after each addition, then beat in vanilla. Add half of the flour mixture and mix at low speed until just blended. Add the sour cream, mixing until just combined, then add the remaining flour mixture, mixing at low speed until the batter is smooth.

4. Divide the batter between the pans, smoothing tops. Bake in the middle of the oven until the cake is springy to the touch and a tester comes out clean, 30 to 40 minutes. Cool in pans on racks 10 minutes, then invert onto racks, remove paper, and cool completely.

5. For the frosting: Melt the chocolates in a double boiler or a large metal bowl set over a saucepan of simmering water, stirring occasionally. Remove the bowl from heat, then whisk in the sour cream and vanilla. Cool to room temperature, stirring occasionally (frosting will become thick enough to spread). You must work quickly and spread the frosting before it becomes too thick. (If icing does become stiff, reheat over simmering water, then cool and try again.)

6. Trim the tops of cooled cake layers with a long serrated knife if necessary to make flat and level. Halve each layer horizontally with a serrated knife to make a total of 4 layers.

7. Put 1 cake layer on a cake plate and spread with 3/4 cup frosting. Layer remaining cake layers using 3/4 cup frosting between each layer. Frost top and sides of cake with remaining frosting.

Note:
This batter can be baked in a 13 x 9 x 2-inch pan 50 to 55 minutes; or in 30 (1/2-cup) muffin cups about 25 minutes.

Tuesday, February 12, 2013

Snow What?


You might have noticed a build up of this white, bulky winter precipitation that you have to shovel. Snow, I think it's called? (See photo above. Poor bastards. Good thing it rained yesterday.) Some of us got more than others (am I right, Boston and much of CT??) and boredom can start to set in when schools, activities and roads (even the L.I.E.??) are closed down. What to do...

I trekked 40 blocks to a friend's apartment to do a little baking and cooking (and by "trekked" I mean "took the subway" and by "cooking" I mean "drank wine") and ended up making two vastly different desserts as the tween trio on site could not decide on only one. "I want chocolate! I want raspberry!" I tried a compromise but it was met with a resounding, "I hate that. Gross." Whatevs. Hand me a cocktail and I can get three kids to make 2 desserts at the same time.

Somehow we decided on molten chocolate cakes circa 1987 and berry cobbler. Did I neglect to mention that "cookies are boring" and that we had to work from existing ingredients in the kitchen? Totally. (Take that Iron Chef!) In the end it all worked out. I even caught the berry tween eating the molten chocolate cake even though she "hates chocolate cake." And of course it wouldn't be 2013 if we didn't Instagram (@tinanders - holla!) the whole damn thing. (By the way, I made another version of the chocolate cakes here but this is the original recipe.) A real camera is just so 2011.


Molten Chocolate Cakes
Adapted from Food & Wine/Jean-Georges Vongerichten

1 stick (4 ounces) unsalted butter
6 ounces bittersweet chocolate, preferably Valrhona
2 eggs
2 egg yolks
1/4 cup sugar
Pinch of salt
2 tablespoons all-purpose flour

1. Preheat the oven to 450°F. Butter and lightly flour four 6-ounce ramekins. Tap out the excess flour. Set the ramekins on a baking sheet.

2. In a double boiler over simmering water, melt the butter with the chocolate. In a medium bowl, beat the eggs with the egg yolks, sugar and salt at high speed until thickened and pale.

3. Whisk the chocolate until smooth. Quickly fold it into the egg mixture along with the flour. Spoon the batter into the prepared ramekins and bake for 12 minutes, or until the sides of the cakes are firm but the centers are soft. Let the cakes cool in the ramekins for 1 minute, then cover each with an inverted dessert plate. Carefully turn each one over, let stand for 10 seconds and then unmold. Serve immediately.

Make Ahead: The batter can be refrigerated for several hours; bring to room temperature before baking.

Mixed Berry Cobbler
Adapted from the Joy of Cooking and Martha Stewart

For the Filling:
2 pints raspberries and/or blackberries (red, black, or a combination of the two)
1/2 cup granulated sugar

For the Biscuit Topping:
1 3/4 cups all-purpose flour
1 3/4 teaspoons baking powder
1/4 cup granulated sugar
1/4 teaspoon salt
6 tablespoons cold unsalted butter
3/4 heavy cream, plus more for brushing
Sugar, for sprinkling (optional)

1. Make the filling: Preheat the oven to 375˚F. Mix together the berries and sugar. Pour into a 2-quart baking dish.

2. Make the biscuit topping: Whisk together the flour, baking powder, granulated sugar, and salt. Cut in the butter until the largest pieces are the size of small peas. Add the cream, and use a fork to incorporate, stirring just until cream is absorbed (there should be lots of loose pieces).

3. Turn out the dough onto a clean surface, and knead once or twice, gathering loose bits into ball. Pat dough to a 1 1/4-inch thickness. Cut into rounds or squares, or leave whole, and place on top of the filling. Brush with cream, and sprinkle with sugar.

4. Bake the cobbler until bubbling in center and biscuit topping is golden brown and cooked through, about 50 minutes (loosely tent with foil if biscuit topping gets too dark). Let stand at least 30 minutes before serving.

Sunday, December 23, 2012

Christmas Eve Eve


It's beginning to look a lot like Christmas...well, in the midwest. No snow here in NYC but the decorations around midtown are pretty impressive. And even though it is Christmas Eve Eve, there is still time to bake more cookies! I think I might need to make an extra batch to take to the movies to eat instead of popcorn...

Last week there was a cookie baking fundraiser at work. For every cookie brought in, the Glad company would donate $1 for each to Cookies for Kids' Cancer. (There is a lack of funding for pediatric cancer research and improving therapies. Take a look at the website!) My office mates and I baked 742 cookies and collected cash donations as well. In one afternoon we raised over $1000! (Makes me feel better about all of the cookies that I ate after the count.) I made these two variations of shortbread which I am wishing I had now. Would be good for Christmas Eve breakfast and I have a free afternoon...


Espresso Shortbread
Adapted from Martha Stewart

2 cups all-purpose flour
3/4 teaspoon coarse salt
1 cup (2 sticks) unsalted butter, room temperature
2 tablespoons espresso powder
1 teaspoon pure vanilla extract
1/2 cup confectioners' or granulated sugar

1. Preheat the oven to 325˚F. Sift together the flour and salt in a small bowl. In a large bowl, with an electric mixer on medium (or in the bowl of a stand mixer), cream the butter until fluffy, 3 to 5 minutes. 

2. Dissolve the espresso powder in 1 teaspoon of hot water and add to the butter along with the vanilla and sugar. Beat until very light and fluffy, scraping down sides of bowl as necessary, about 2 minutes more. Add the flour mixture, and beat on low, scraping the bowl if necessary, until flour is just incorporated and dough sticks together when squeezed.

3.  Form the dough into a disk; wrap in plastic, and refrigerate for at least 1 hour (or overnight). Roll out the dough to a 1/4-inch thickness. Cut into 2-inch rounds. Score a line down the middle of each with the back of a knife and refrigerate for 20 minutes.

4. Bake until firm, about 20 minutes. Let cool for 3 minutes then transfer the cookies to a wire rack, and let cool completely. Cookies will keep, in an airtight container, at room temperature 3 weeks.

Note: This dough can be prepared and refrigerated overnight or frozen for up to three months, covered tightly with plastic wrap. Thaw the frozen dough overnight in the refrigerator before using. The baking time for the shortbread will vary depending on the kind of pan and cutters used.


Pecan Sandies
Adapted from Martha Stewart

1 cup (2 sticks) unsalted butter
1/3 cup granulated sugar
1 teaspoon pure vanilla extract
2/3 cup pecans, finely ground
1 2/3 cups all-purpose flour
Pinch of salt
1/4 cup confectioners' sugar

1. Heat the oven to 350˚F. In the bowl of an electric mixer fitted with the paddle attachment, cream the butter and sugar on medium-high speed until light and fluffy, 2 to 3 minutes. Beat in the vanilla.

2. Mix the ground pecans with the flour and salt, and add to butter mixture. Beat, beginning on low speed and increasing to medium, until combined, about 1 minute.

3. Lightly flour your palms, if necessary, and roll the dough into 3/4-inch balls. Place on an ungreased baking sheet 1 inch apart. Bake until just brown on edges, about 20 minutes. Remove the cookies from the baking sheet while still warm; sift confectioners' sugar over tops.

Sunday, November 18, 2012

Discovering Fall

It's been a crazy month and I'm personally looking forward to it's end. I'm exhausted. And I can't believe that Thanksgiving is only a few days away! I haven't been cooking at all, unless you count defrosting some of the contents of my freezer in anticipation of losing power (which I did not, thankfully!). I am totes looking forward to trying out some new fall side dishes and baking some pies. 

Somewhere along the way, and for some unknown reason, I made a carrot cake, a potential alternative to pumpkin pie or a nice fall birthday cake. (I probably bought carrots for another use and forgot why.) Speaking of birthdays, I recently had one of my own and on that oh-so-special day, managed to get a reservation to see Discovering Columbus, the installation by the artist, Tatzu Nishi. The exhibition has been extended because of The Hurricane, so you now have until December 2 to get your own reservation. (It's free, but you need an advanced reservation to see it.) I highly recommend it. When else are you going to be able to see a statue in person that is otherwise situated out of reach at 75 feet in the air? And then you should go home and make some carrot cake. Because there's...Cream. Cheese. Frosting.


The structure

Entering The Room

Columbus

Nishi's Wallpaper Design


Carrot Cake with Cream Cheese Frosting
From The Ski House Cookbook

Cake 
2 cups all-purpose flour
2 cups sugar
2 teaspoons baking powder
2 teaspoons baking soda
2 teaspoons ground cinnamon
1 teaspoon salt
Pinch of ground nutmeg
4 large eggs
1 1/3 cups canola oil
3 cups shredded carrots (about 6 medium)
1 cup chopped pecans


Frosting
1 (8-ounce) package cream cheese, room temperature
1 (16-ounce) box confectioner’s sugar
8 tablespoons (1 stick) unsalted butter, softened
2 teaspoons vanilla extract

1. Preheat the oven to 350° F. Butter one 9 x 13 pan or two 9-inch round cake pans.

2. To make the cake, in a medium bowl, stir together the flour, sugar, baking powder, baking soda, cinnamon, nutmeg and salt. In a large bowl, beat the eggs lightly to combine, then whisk in the oil. Add the dry ingredients to the wet ingredients and stir to combine. Stir in the carrots and nuts. 

3. Pour the batter into the prepared pan or divide the batter evenly between the two round pans. Bake for 45 minutes, until a toothpick inserted into the center of the cakes comes out clean. Remove to a rack to cool. For the round pans, cool for 5 minutes, then unmold and cool completely. 

4. To make the frosting, in a large bowl beat together the cream cheese, confectioner’s sugar, butter, and vanilla. Spread the frosting evenly over the top. For a layered cake, spread the frosting between the layers and over the sides and top. Store covered at room temperature for up to 2 days or refrigerated for up to 5 days. 

Friday, September 28, 2012

Peaches!

While a lot of peeps are bemoaning the end of summer, I am looking forward to the upcoming crisp fall afternoons and football Saturdays. (Go Blue!) So far September has been a pretty great month with plenty of sunny skies and 70 degree days. But truth be told I’m still looking forward to those cooler 50 and 60 degree days. Maybe in October?

The one thing that I regretted about this past summer was not baking a blueberry pie. It’s totally my fave and I totally slept on it. I went out looking for berries last week and was only able to find blueberries from Canada. To be honest, I don’t even recall seeing many local berries all summer. Did I just miss the entire season? Did they not do well this year? New Jersey peaches, however, were still available in my farmers’ market last weekend, along with some killer tomatoes. And I don’t mean Attack of the Killer Tomatoes. That’s something else all together. (And highly recommended!) May I present, a very late summer, classic peach pie!


Classic Peach Pie

Crust:
2 1/2 cups all-purpose flour
3/4 teaspoon salt
2 sticks (8 ounces) cold unsalted butter, cut into 1/2-inch pieces
1/3 cup ice water, plus more if needed

Filling:
6 - 8 large, ripe but firm peaches (about 3 1/2 pounds)
1/2 cup sugar (or to taste), plus more for garnish
1 tablespoon fresh lemon juice
1/4 cup all-purpose flour
1 1/2 tablespoons unsalted butter, thinly sliced

Egg wash:
1 egg yolk mixed with 2 tablespoons water

Vanilla ice cream, for serving


1. In a food processor, pulse the flour and salt until combined. Add the butter and pulse briefly, until the mixture resembles coarse meal. (To mix by hand combine the dry ingredients in a large mixing bowl then cut in the butter with a pastry blender.) Transfer the mixture to a large bowl and sprinkle the ice water on top. Stir with a fork until a crumbly dough forms. (Add more water one tablespoon at a time if needed.) Turn the dough out onto a work surface and knead 2 or 3 times, just until the dough comes together. Cut the dough in half and form into 2 disks; wrap in plastic and refrigerate until firm, at least 1 hour or overnight.

2. On a lightly floured surface, roll out each disk of dough to a 12-inch round. Ease one of the rounds into a 9-inch glass pie plate and transfer the other round to a baking sheet. Refrigerate.

3. Preheat the oven to 400°. Bring a large saucepan of water to a boil and fill a large bowl with ice water. Using a sharp knife, mark a shallow X in the bottom of each peach. Blanch the peaches in the boiling water for about 1 minute, until the skins begin to loosen. Using a slotted spoon, transfer the peaches to the ice water to cool. Drain and peel the peaches and cut them into 1/2-inch wedges. Transfer the peach wedges to a large bowl. Add the sugar, lemon juice and flour, toss well and let stand for 5 minutes.

4. Pour the peaches and their juices into the chilled pie shell and scatter the butter slices on top. Brush the edge of the pie shell with the egg wash and lay the round of dough from the baking sheet on top. Press the edges of the pie shell together to seal and trim the overhang to a 1/2 inch. Fold the edge of the pie dough under itself and crimp. Brush the remaining egg wash on the top crust and cut a few slits for venting steam. Sprinkle with sugar.

5. Place the pie on a parchment lined baking sheet and transfer to the preheated oven. Bake for 20 minutes. Reduce the oven temperature to 350°, cover the edge of the pie with foil, and bake for about 45 minutes longer, until the filling is bubbling and the crust is deeply golden. Transfer the pie to a rack to cool completely. Serve with vanilla ice cream, if desired.