Sunday, June 11, 2017

Cold Sesame (Zucchini) Noodles


It's the start of a heat wave, or so I've heard, and I'm not about to turn on the oven. And I recognize that it would appear as if I haven't turned on the oven in the past 11 months!! I just realized while watching the French Open this morning, that my last post was in reference to Wimbledon. In July. Of last year. I obviously have a thing for eating while others are playing some hard core tennis. And I'm a super lazy blogger.

Rather than make something sweet today (I did actually get off the couch to go to the gym) I decided to jump on the zoodle bandwagon. For the record: 1. I hate the word "zoodle." 2. It would be a terrible band name. Anyhow...this recipe substitutes fresh zucchini noodles (totally uncooked!) for the more typical egg noodle, therefore saving a few extra calories and excess heat from your stovetop. 

I happen to have a really small spiralizer gadget from OXO so will occasionally make some zucchini (or other veggie) noodles because it doesn't take up a ton of space and it makes me feel healthy...until I pour another glass of wine. Add as much garnish and protein as you like to make this a more substantial salad. Note: The longer your zucchini sits in the sesame sauce, the more watery it will become. Good to know if your sauce is a bit thick. (Like me.) It will ultimately thin out. (I wish!)


Cold Sesame Zucchini Noodles

2 tablespoons sesame oil
1/3 cup tahini, peanut butter, almond butter or a combination
3 tablespoons soy sauce, or to taste
2 tablespoons sugar
1 tablespoon rice or white wine or other vinegar
2 teaspoons minced fresh ginger
1 teaspoon minced garlic
Hot sesame oil, chili-garlic paste or Tabasco sauce to taste
2 large zucchini, trimmed and spiralized
2 medium carrot, trimmed and spiralized (if desired)
Optional: Sliced cucumber, cubed tofu, chopped peanuts, sesame seeds, hot sauce

1. Whisk together the sesame oil, nut butters, soy, sugar, vinegar, ginger, garlic and hot oil in a large bowl. Taste and adjust.

2. Toss zucchini and carrot noodles with the sauce. Garnish as desired. Serves 2 main portions or 4 appetizer portions.

Sunday, July 10, 2016

Grand Slam #Cake


Remember me? The extremely occasional cook? I've clearly taken a break. Occasions have come and gone and I've just been...lazy apparently. I do have quite a stockpile of recipes that I plan to unroll over the next few weeks. I got inspired by my friend's 13 yo daughter and her friends playing Top Chef with my recipes on a recent  Saturday afternoon. Let's see what actually happens!

Once again breakfast at Wimbledon has come and gone and the American ladies have come out on top. Congrats to Serena on her 22nd grand slam title and to both her and Venus on their doubles win! And of course kudos to Andy Murray on his second Wimbledon title. Truth be told I can't really play tennis but thanks to the generosity of a friend, I have taken a few lessons so that I can at least hit the ball over the net. Most of the time.

As a nod to the British hosts and American players, I made a version of the classic Wimbledon treat, strawberries and cream. I didn't make a shortcake this time but a classic pound cake or #cake or £cake...whatever. (Mine weighed in at a voluptuous 3.5 pounds!) A pound cake is as delish for breakfast as for dessert and though I seriously need to stay away from all things butter and sugar, I made it anyway. Office mates, save room for breakfast tomorrow!


Classic Pound Cake
Adapted from King Arthur Flour

1 cup (16 tablespoons) unsalted butter, at room temperature
1 cup granulated sugar
4 large eggs, at room temperature
2 cups unbleached all-purpose flour
1 1/2 teaspoons baking powder
1 teaspoon salt
1/2 cup milk
1 teaspoon vanilla extract (or extract flavoring of your choice)

1. Preheat the oven to 350°F. Lightly grease a 9" x 5" loaf pan.

2. In a large bowl, or in the bowl of a stand mixer, beat the butter until very light.

3. Beat in the sugar gradually and then the eggs, one by one. Scrape the bottom and sides of the bowl, and beat until the mixture is very light and fluffy.

4. In a separate bowl, whisk together the flour, baking powder, and salt.

5. In another small bowl, whisk together the milk and extract.

6. Alternately add the wet and dry ingredients to the butter mixture, starting and ending with the flour. Stir to combine after each addition.

7. Pour the batter into the prepared pan, smoothing the top.

8. Bake the cake for 60 - 65 minutes, until it springs back when pressed lightly in on top, and a long toothpick or cake tester inserted into the center comes out clean. If the cake appears to be browning too quickly, tent it with foil for the final 15 minutes of baking.

9. Remove the cake from the oven, and loosen its edges. Wait 5 minutes, then carefully turn it out of the pan onto a rack to cool. Store, wrapped in plastic, for a day or two before serving. Wrap well and freeze for longer storage. Makes 1 loaf cake, about 18 servings.


Thursday, December 24, 2015

Happy Christmas Eve


Rosé anyone? It's Christmas Eve and rather than reaching for a mug of hot buttered rum, I'm thinking pink. It's 71 degrees in NYC and people's heads are exploding like it's Snomageddon 2.0. There is nothing that peeps like to talk about more than the weather, and I am clearly no exception. I do love a white Christmas but if it's going to be 70 freaking degrees, then I am going to behave accordingly.

If you are still in the mood to turn on the oven to bake and are looking for a slightly more modern shortbread cookie, then look no further than these Cardamom Crescents. The cardamom provides an unexpected flavor profile that's not your standard vanilla holiday cookie. Mine may look more like half moons than crescent moons, so if that concerns you, I would suggest chilling your dough for a bit before baking, the same way I'll be chilling my Christmas rosé.


Cardamom Crescents
Adapted from The New York Times

3 ½ cups all-purpose flour, plus more for rolling
2 teaspoons ground cardamom
1 teaspoon kosher salt
14 ounces unsalted butter (3 1/2 sticks), at room temperature
1 ¼ cups confectioners’ sugar, plus more for dusting
2 large egg whites
¼ cup sliced almonds, if desired

1. Heat the oven to 350ºF and line two baking sheets with parchment paper. In a medium bowl, add the flour, cardamom and salt, and whisk to combine.

2. In the bowl of an electric mixer, beat the butter and sugar on low speed until just combined. Add the egg whites, beat until just combined, then add the flour mixture and mix until just combined.

3. Divide the dough into 8 equal pieces. On a lightly floured surface, roll one piece out into a log 3/4-inch thick. Using a bench scraper or sharp knife, cut 3-inch pieces off the log. Working with one 3-inch piece at a time, gently roll both ends so they taper slightly, then form into a crescent. Transfer to prepared baking sheet; repeat with remaining dough, placing the crescents 1-inch apart. Allow to chill in the refrigerator for 30 minutes.

4. Gently press 1 almond slice into each cookie, if using. Bake until light golden brown, 10 to 14 minutes. Cool, then dust with confectioners’ sugar.

Saturday, July 4, 2015

Independent Women


Once again the Fourth of July holiday and Wimbledon tennis tourney coincide, and particularly well this year with American women making up 25% of the round of 16!! Venus, Serena, Madison Keys and Coco Vandeweghe will all be representing the USA in the fourth round. Get ready for Monday's epic sibling match-up of Venus and Serena, their 26th time playing each other. So exciting!

The American men aren't faring as well. John Isner lost to Cilic in the 3rd round so Denis Kudla is the lone American man who has made it through to the fourth round. Also of note: Rafa got knocked out in the 2nd round when he lost to Jamaican-German Dustin Brown (his second loss to Dustin on grass). Sorry, Rafa. (Stick to clay!) Fortunately we will be seeing more Federer! Go Roger!!!

Anyhoo, I am no sports reporter so the whole point of this post is my latest Breakfast at Wimbledon recipe. Instead of traditional scones, in honor of Independence Day and the American women still playing, I opted for the more all-American breakfast treat, blueberry muffins. I'm sure that none of these fabulous athletes would dare eat such empty calories during this tournament, so I will do it for them!

This blueberry muffin recipe is adapted from The Ski House Cookbook where I used sour cream to make a much lighter muffin with a more delicate crumb. Speaking of crumbs, I added a crumb topping that I swiped from the coffee cake recipe also in the book. These are great for breakfast or dessert. Or for winning a tennis tournament. Probably.


Super Sour Cream, Blueberry-Crumb, Fourth-of-July Wimbledon Muffins

Topping:
3/4 cup all-purpose flour
1/2 cup (packed) light brown sugar
5 tablespoons cold unsalted butter, cut into pieces

Muffins:
2 cups all-purpose flour
1 tablespoon baking powder
1/2 teaspoon baking soda
1/2 teaspoon salt
1 large egg
3/4 cup sugar
8 tablespoons unsalted butter (1 stick), melted
1/4 teaspoon vanilla
1 cup sour cream
1 teaspoon lemon zest (optional)
1 cup fresh (or frozen) blueberries


1. Preheat the oven to 375° F.  Butter a standard (12-cup) muffin tin and set aside. 

2. Prepare the topping: In a small bowl stir together the flour and brown sugar. Add the butter and using a pastry blender or fork, mix the ingredients until they are crumbly, resembling a coarse sand. Set aside until ready to bake.

3. Prepare the muffins: In a large bowl stir together the flour, baking powder, baking soda and salt and set aside.

4. In a medium bowl whisk the eggs, sugar, butter, vanilla and lemon zest if using. Stir in the sour cream.

5. Make a well in the center of the dry ingredients. Pour the wet ingredients into the dry ingredients and stir just to combine. Do not over mix. Divide the batter evenly in the muffin tin and sprinkle the tops with the crumb topping.

6. Bake until golden, about 20 minutes. (A toothpick inserted into the center of a muffin should come out clean.)  Cool the muffins in the pan on a rack for about 10 minutes. Remove the muffins from the pan to a rack to continue cooling. Serve warm or at room temperature. Makes 12 muffins.

Sunday, March 1, 2015

Peanut Butter, Death & Taxes


What a great start to March. It's dark, cold, snowy…why not spend the day doing taxes? Oh sure, I could have gone to brunch, had a mani/pedi, seen one of the Oscar flicks that I missed...but why, when the call of the IRS was so strong? Having a glass of wine seemed sadly, wrong, what with all of the simple arithmetic and attempts to figure out my farm income and alimony received. TMI? 

Baking is a good procrastinatory measure and a little sugar never hurts when math is involved. This peanut butter cookie recipe ran in the NY Times late last year and is a pretty close approximation to the City Bakery peanut butter cookie (in case you are a fan). Normally I stick with my simplified, 5 ingredient version, but this one is pretty…pretty…pretty good. I like that the name references one of my favorite packaged cookies of all time: The Pecan Sandie, or, as Keebler officially calls them, the Keebler Sandies Pecan Shortbread cookies. (With registered trademarks throughout too BTW.) This particular recipe makes a much saltier, denser and softer variety than Keebler (and also peanut obvi) and I highly recommend giving them a try, even if you aren't doing your taxes.  And I'm not anymore…cuz I'm done! JEALOUS??


Peanut Butter Sandies

1 cup (2 sticks) unsalted butter, softened at room temperature
¾ cup granulated sugar
¾ cup (packed) light brown sugar
1 heaping teaspoon kosher salt
2 cups unsweetened peanut butter, creamy or chunky
2 eggs, at room temperature
2 cups all-purpose flour
Flaky sea salt and coarse sugar for sprinkling (or use kosher salt and granulated sugar)

1. Heat the oven to 350˚F and line 2 baking sheets with parchment paper or nonstick liners. In a mixer fitted with a paddle attachment, cream the butter and sugars until smooth and fluffy, at least 3 minutes. Add the peanut butter and eggs, and mix. Add the flour and salt and mix just until well combined, with no white flour showing.

2. Using a small cookie scoop (about 2 teaspoons capacity), scoop dough onto the prepared pans. The tops will be rounded but craggy. The cookies will not spread much or change shape when they bake, so they can be placed quite close together, but leave room for air circulation so they can brown.

3. In a small bowl, mix 2 tablespoons sugar with 1 tablespoon salt. Sprinkle each cookie lightly with sugar-salt mixture, getting it into the crags and crannies. Bake 12 to 15 minutes, until the cookies are set and golden-brown. Carefully lift or slide off baking sheets and cool on racks. Store in layers separated by parchment paper, in airtight containers.

Sunday, January 18, 2015

Blue Apron Optional


Guys? Hey, guys? Anyone?? I'm finally back from an extended commercial break! I can't believe that I have been MIA for so long that Thanksgiving and Christmas have come and gone without a single holiday baking post from moi. (And I shockingly only made one batch of cookies over the entire holiday season.) Speaking of the holidays, after traveling for a majority of the time, coming home to an empty kitchen definitely provided enough temptation to order in, until I remembered that I had a delivery coming from Blue Apron. Sorry, Seamless.

Pre-packaged meal delivery is not necessarily something that I would seek out, but since I was getting my first delivery for free I figured that I might as well check it out. In my box I received the ingredients for three meals for two: pulled chicken tacos, beef bolognese and Thai coconut shrimp soup. The problem is, you have to be in the mood to cook and in the mood to eat specifically what is being delivered to you! Upon my delivery, I unpacked the entire box and then proceeded to eat pita chips and hummus because I really didn't feel like cooking. 


Everything was very well planned and packaged, and all of the ingredients were fresh, but I still felt like there was something lacking. On day two I made the pulled chicken tacos, sort of. I froze one chicken breast, cooked the other according to directions, and then skipped the side salad and made guacamole instead. I used the leftover sauce to make black beans and rice two days later. 

On day four I made the Thai shrimp soup. I followed the directions but added fish sauce because there was an overall lack of saltiness to balance out the hot/sour/sweet flavors. I also preferred to serve it more like a curry served over the rice versus a soup with a little bit of rice added in. It was also generously portioned and I ended up eating it for 3 meals.

On day seven I finally got around to making the beef bolognese. (Fear not! I kept checking the expiration dates so that nothing spoiled.) Again I followed the directions but having made bolognese from scratch before, I knew that it was going to be pretty basic. A little too basic for me. I added white wine and diced tomatoes at the point at which BA would have you serve it, and then proceded to simmer it for another 30 minutes. I think it added an acidity and sauciness that otherwise would have been lacking. This was also a very generous portion. The recipe was meant to serve two, but I have managed to extend it for 4 meals. Oh! I forgot to mention that you were supposed to stir brussels sprouts leaves into the sauce at the end. Umm…ok. Random!

I can see how this concept would work for people who have a problem planning and shopping for meals, but I guess I like to be a little more improvisational. There is very little waste, which as a person cooking for one, I do appreciate. Purchasing an entire bunch of cilantro or head of celery when you only need a tablespoon is super annoying since the unused portion often spoils in the fridge. And having someone else locate lemongrass and coconut palm sugar was pretty rad. 

You are given the ability to skip deliveries and to make basic recipe requests (like meat preferences etc.) so I could see doing this once every month or so, but I think for the most part I'll stick to making my usuals and skip the blue apron.


Quick Beef Bolognese

Olive oil
2 cloves garlic, minced
1 carrot, peeled and diced
1 stalk celery, diced
1 yellow onion, diced
1 tablespoon minced fresh rosemary
3 tablespoons tomato paste
8 ounces ground beef
1/2 cup dry white wine
1 (14.5 ounce) can diced tomatoes
8 ounces fresh pappardelle pasta
1/3 cup parmesan cheese

1. In a large pan, heat 1 tablespoon of olive oil on medium until hot. Add the garlic, carrot, celery, onion and rosemary. Season with salt and pepper. Cook stirring occasionally, 2 - 4 minutes, or until softened and fragrant.

2. Add the tomato paste and cook stirring frequently, 2 - 3 minutes, or until fragrant. Add the beef, season with salt and pepper and cook, breaking the meat apart with a wooden spoon for 4 - 6 minutes, or until browned and cooked through. 

3. Add the wine and cook for 3 minutes. Add the tomatoes, stir to combine, lower the heat to medium-low and simmer, stirring occasionally, for 30 minutes.

4. Meanwhile, heat a medium pot of salted water to boiling on high. Add the pasta and cook for 3 - 4 minutes or until just al dente. Reserve 1 cup of the pasta water. Drain the pasta and add directly to the sauce. Toss to coat and add the reserved pasta water as needed to thin the sauce. Remove from the heat and add half of the cheese. Toss to coat and serve with remaining cheese on the side. Serves 2 - 4.


Coconut Red Curry Shrimp

1/2 cup jasmine rice
Vegetable oil
2 cloves garlic, minced
1 (1-inch) piece ginger, peeled and minced
2 stalks lemongrass (tough outer layers removed; one stalk minced and one stalk cut in half and smashed)
1 scallion, sliced (separate the green and white parts and reserve)
1 red bell pepper, cored and sliced
2 tablespoons red curry paste
1 (13.5 ounce) can unsweetened coconut milk
2 teaspoons coconut palm sugar
1 lime, zested and quartered
1 tablespoon fish sauce
8 ounces shrimp
1 bunch cilantro, chopped

1. In a small pot, heat the rice, 1 cup of water and a pinch of salt to boiling on high. Cover and reduce the heat to low and simmer for 12 - 14 minutes until the water is absorbed and the rice is tender. Remove from the heat and set aside.

2. In a medium pot, heat 2 teaspoons of oil on medium-high until hot. Add the garlic, ginger, minced lemongrass and the white parts of the scallion. Cook, stirring frequently, 1 - 2 minutes. Add the bell pepper and season with salt and pepper. Cook, stirring occasionally, 1 - 2 minutes, or until softened.

3. Add the red curry paste, to taste. Cook, stirring frequently, 1 - 2 minutes or until fragrant.

4. Add the coconut milk, palm sugar, lime zest, fish sauce, reserved lemongrass pieces and 1 cup of water to the pot and season with salt and pepper. Reduce the heat to medium-low and cook, stirring occasionally, 3 - 4 minutes or until thoroughly combined. 

5. Season the shrimp with salt and add to the soup. Cook, stirring occasionally, 8 - 10 minutes or until opaque and cooked through. Turn off the heat and add half of the cilantro and the juice of two lime wedges. Discard the smashed lemongrass. Serve the curry with the rice and top with the remaining scallions and cilantro and lime wedges. Serves 2 - 4.

Sunday, October 19, 2014

Hellooo…Newman.


Woah. It's mid-October and by looking at this blog you'd think that I've been on permanent summer vacation. I wish! I've just been lazy. And drinking rosé and eating salads. But now that it's nearly Halloween, it's time to see if my oven still works! Once I remove all of the pot and pans that are stored there!

With all of the recent Instagram posts from pumpkin patches and apple orchards, an apple recipe seemed the way to go. Granted this recipe uses one singular apple, but it's the thought that counts. And BT dubs, if you go to an orchard and only want to bring home an apple vs. a bushel, you'll be good to go! 

I randomly have a square muffin tin and it makes these little guys look like cute individual cakes rather than your average muffin. Perhaps along the lines of something that could be sold in an individual package like a Drake's Coffee Cake. The full size, not the junior. (Sometimes I feel like I am living a Seinfeld episode, but I digress…) The point is (what was my point again?) that these are super tasty and my oven still works!


Individual Apple Crumb Cakes
Adapted from Food & Wine

Streusel:
1 cup all-purpose flour
1/2 cup light brown sugar
1/2 teaspoon salt
5 tablespoons cold unsalted butter, cut into small pieces

Cakes:
1 1/2 cups all-purpose flour
1 cup granulated sugar
1 teaspoon salt
1 1/2 teaspoons baking powder
1/2 teaspoon baking soda
1/2 teaspoon ground cinnamon
1 stick cold unsalted butter, cut into small pieces
3/4 cup sour cream
1 large egg, beaten
1 large Granny Smith apple, peeled and finely diced


1. Make the streusel: Preheat the oven to 350°F. In the bowl of a standing mixer fitted with the paddle, or using a pastry blender in a medium bowl, combine the flour with the brown sugar and salt. Add the butter pieces and mix at medium-low speed until the mixture resembles coarse meal. Continue mixing the streusel until very small clumps form. Refrigerate until it is well chilled, about 10 minutes.

2. Make the crumb cakes: Line 12 standard-size muffin cups with paper liners, or simply butter the muffin tin. In a large bowl, combine the flour with the granulated sugar, salt, baking powder, baking soda and cinnamon. Add the butter pieces and cut in with a pastry blender until the mixture resembles coarse meal. Add the sour cream and beaten egg and mix until the batter is smooth. Add the diced apple and stir just until incorporated.

3. Fill the muffin cups halfway with the crumb cake batter. Press the streusel into clumps and sprinkle on top. Bake the crumb cakes in the center of the oven for about 30 minutes, until risen, golden and springy to the touch. Rotate the pans halfway through baking. Let the crumb cakes cool slightly before serving. Makes 12.

Wednesday, September 3, 2014

Have it Your Way


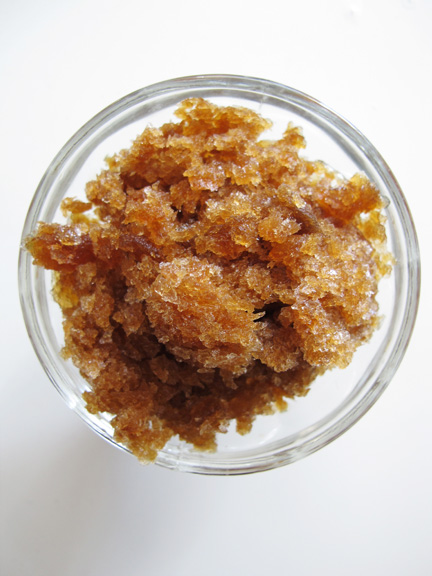
Summer weekends may have come to an end, but it's still hot, hot, hot! I spent most of my summer meal times sipping rosé rather than cooking anything (and is quite evident by my blog posts). I may have had a few cashews on the side for good measure. When it was super hot, I branched out and picked up some fro-yo or made this simple granita. What's great about a granita is that you don't need a fancy ice cream maker or other gigantic contraption, and you can really make any flavor that you want (maybe I should have made a rosé granita). This espresso version gives you a little caffeine jolt alongside the icy cold sensation, so go ahead and have it for breakfast. It's iced coffee weather!


Espresso Granita

2 cups strong hot coffee or espresso
1/3 to 1/2 cup sugar, to taste
1/2 teaspoon pure vanilla extract

1. Stir espresso, 1/2 cup sugar, and vanilla in a medium bowl until the sugar dissolves.

2. Pour into a 9x9x2" metal baking pan and freeze for 1 hour. Stir, mashing any frozen parts with the back of a fork. Cover; freeze until firm, about 2 hours.

3. Using a fork, scrape granita to form icy flakes. The granita can be made 3 days ahead. Cover tightly with foil; keep frozen. Give it a quick scrape before serving.

Monday, June 30, 2014

It Ain't Easy Being Green

For the past week, I've been a guinea pig. (OK, not literally.) I volunteered, along with few others, to test out a diet book for an upcoming article at work. I thought it would be a good opportunity to hit the reset button and stop pretending that I can eat and drink like I am 21. Which I am not. I thankfully only have to commit for two weeks. By the way, I'm calling it a diet because it is. (And it says so on the front cover.) It's only meant to be followed for four weeks to achieve rapid weight loss and is not meant to be incorporated into one's lifestyle full time.

While I have dropped 4 pounds in the first week, I can't believe that the weight loss will last long. The caloric restriction is a bit much. For example, by 5:00 pm today I had only consumed 550 calories. (Yes, I was getting hangry!) According to my tabulations, on most days I have been limited to 1000 calories tops. There's no way I'll be able to sustain that on my own, particularly because I am currently required to include several meals that should consist of either a 200-calorie fruit smoothie, protein shake or low-sodium soup. I personally don't like to drink my calories, so have opted for the soup. I quickly realized that I better start making my own soups because on my last run to Pret A Manger for my liquid-ish lunch, I discovered that several of their small soups top out at 1100 mg of sodium! (Your entire daily intake should be between 1500 mg and 2300 mg.) No joke! Also not a joke? Saturday's 100-calorie snack suggestion of 2 tablespoons of poppy seeds OR 6 oysters. Ummm…when is the last time you or anyone you have ever met in your life has eaten poppy seeds? That weren't in a muffin? And who snacks on oysters without a glass of wine? (Oh yeah, I'm not drinking alcohol or coffee either.)

So...I bring you fresh pea soup. Or frozen pea soup. Whatever you can find. It's super quick and easy and meets my stupid diet requirements. Typically fresh pea soup is coupled with mint but I found a recipe from The NY Times that suggested tarragon which I thought was a nice alternative. It's delish. I think I'll save the mint for all of the mojitos that I'm going to make once this is all over!

Summer Pea Soup
Adapted from Bon Appétit

2 tablespoons unsalted butter
1 medium onion, chopped
4 cups low-sodium vegetable broth, divided
6 cups shelled fresh peas (from about 6 pounds pods) or 1 (16-ounce) bag of frozen peas, thawed
1/2 tablespoon chopped fresh tarragon
1 teaspoon kosher salt, 
1/4 teaspoon freshly ground black pepper

1. Melt the butter in a large heavy pot over medium heat. Add the onion and cook, stirring often, until softened but not browned, 6-8 minutes. Add 2 cups broth and bring to a boil. Add the peas, reduce the heat, and simmer gently until tender, about 5 minutes for fresh peas, about 2 minutes for frozen.

2. Remove the pot from the heat. Add the tarragon and remaining 1-2 cups broth to pot, if desired. (Add any additional broth according to your desired consistency.) Purée the soup in a blender or with an immersion blender until smooth. Taste and adjust seasoning. Serve warm or chilled. Serves 4 - 6.

Saturday, May 31, 2014

Curds and Whey (aka My New Band Name)

Little Miss Muffet sat on a tuffet eating her curds and whey…ummmm…yeah. That's very descriptive but not especially appealing. However, in the midst of my first attempt at making homemade ricotta, I immediately thought of little Miss Muffet. The thing is, to make ricotta (which is totes easy!) you are intentionally making curds and whey by heating milk, adding lemon juice to curdle it, then straining. Whey is the liquid that remains after you strain the curdled milk. Sounds delicious, Miss Muffet! 

Actually, homemade ricotta is super delish. I've already eaten more than half of the batch that I made because it's at least 17 billion times better than almost any other ricotta you'll buy in a little plastic tub! I'm guessing that little Miss was just eating a cottage cheese type of snack, but she for sure would have preferred this ricotta. Trust.

Fresh Ricotta

3 cups whole milk
3/4 cup heavy cream
1/2 teaspoon coarse sea salt
3 tablespoons freshly squeezed lemon juice

1. Pour the milk, cream and salt into a 3-quart nonreactive saucepan. Attach a candy or deep-fry thermometer. Heat the milk to 190°F, stirring it occasionally to keep from scorching on the bottom. (You could also eyeball the temperature by waiting until the mixture begins to simmer, but hasn't yet come to a full boil.) Remove from the heat and add the lemon juice. Stir once, gently and slowly, then let the pot sit undisturbed for 5 minutes to allow the curds to form.


2. Meanwhile line a colander with two layers of cheesecloth and place over a large bowl. Pour the milk mixture (curds and whey) into the colander and let the curds strain for at least 30 minutes, discarding the whey as necessary. At this point you'll have a soft, spreadable ricotta. If you continue to strain for up two hours, it will still be spreadable but a bit firmer. It will continue to firm as it cools. 


3. Discard the whey (unless you want to save it for other purposes). Use the ricotta right away or transfer it to an airtight container and refrigerate (up to 4 days) until ready to use. Serve with pasta or with toasted baguette drizzled with honey or olive oil or both. Makes about 1 1/2 cups.


Sunday, April 20, 2014

Let Them Eat Cake

It's a gorgeous Easter Sunday in NYC and I still have yet to find an abundance of spring veggies. Maybe I'm not shopping at the right places? Fine. Who needs vegetables anyway? Let's forget healthy living for a minute and just bake! 

I decided to make a dessert using only ingredients that I already had on hand, but didn't want it to be super boring looking. Hellooo, 1950s! I unearthed my bundt pan (that I've had for years but never used) to put to use for the first time.  If you don't have a bundt pan, you could swap in 2 regular (8-inch) cake pans or 1 (9x13) baking pan, but just check for doneness earlier in the baking process.

This is a very simple cake recipe, but I recommend using a stand mixer if you can. (There's no reason to exert yourself!) The cake is light in texture and sweetness so is perfect as a spring dessert. Or for breakfast. Or lunch. Or tea time. Or Mad Men viewing. You get the picture. Having a hard time hanging with the relatives? Forgot to file your taxes? Just eat cake! 

Lemon Bundt Cake
Adapted from King Arthur Flour

Cake
1 cup unsalted butter, softened
2 cups sugar
1 teaspoon salt
4 large eggs
2 teaspoons baking powder
3 cups unbleached all-purpose flour
1 cup whole milk
Finely grated zest of 2 lemons

Glaze
1/3 cup freshly squeezed lemon juice
3/4 cup sugar


1. Preheat the oven to 350°F. Lightly grease a 10" tube pan, or a 9" to 10", 9- to 10-cup capacity bundt-style pan.

2. Beat together the butter, sugar, and salt, until light and fluffy. Add the eggs one at a time, beating well after each addition.

3. Add the baking powder, then add the flour alternating with the milk, starting and ending with the flour. Mix until smooth. Stir in the grated lemon zest.

4. Spoon the batter into the prepared pan, smoothing the top with a spatula. Bake the cake for 50 to 55 minutes, or until a cake tester inserted into the center comes out clean.

5. While the cake is baking, make the glaze by stirring together the lemon juice and sugar in a small bowl. Set aside.

6. Remove the cake from the oven, and set it on a rack. After 5 minutes, run a knife around the edge of the pan to loosen, and turn the cake out onto a rack.

7. Poke the hot cake all over with a cake tester or toothpick. Stir the glaze to combine, and immediately brush it on the hot cake. Let it sink in, then brush on more glaze, continuing until all the glaze is used up. Allow the cake to cool before slicing. Serves 16.

Monday, March 31, 2014

Going Green


Tomorrow is already April 1st. I pity the fool! Isn't it time for fava beans and morels and garlic scapes and peas?? Well, I haven't seen much in the way of spring veg. In fact, my little local farmers market (apostrophe optional...discuss) has yet to open for the season. It's quite small so they wisely avoid the coldest months and in December, pass the torch to the French Canadians who sell some pretty great looking (and smelling) Christmas trees. No one else wants their space from January to April, I guess, as all that is usually for sale (on the ground) are some VERY used paperbacks. But I confess. I digress. (I'm a poet and I didn't even know it!)


While hoping for some new veggies to finally inspire me to mix things up, I found the most GINORMOUS bushels of parsley at Whole Foods. WTF? Kinda weird, right? Number 1: Are they on steroids? Number 2: When you use parsley, don't you need, like, a chopped tablespoon at most? What does one do with all the rest? Well, I searched for the answer and found a parsley pesto that requires a bit more parsley than a garnish, but you'd really have to double or triple the recipe (and make some tabouli) to use all of the parsley that I had. And as much as you might prefer a basil pesto, which is pretty fabulous, this is super tasty. And, I know that this is totally off topic but…the Mad Men final season starts soon!!


Walnut-Parsley Pesto Pasta
Adapted from Food & Wine

1 cup walnuts

1/2 cup lightly packed flat-leaf parsley with thick stems removed
1 clove garlic, smashed
3 tablespoons grated Parmesan cheese, plus more for serving
1/2 cup olive oil
1/2 teaspoon salt
1/4 teaspoon fresh-ground black pepper
1 pound cut pasta
1 tablespoon butter


1. In a food processor or blender, pulse the walnuts, parsley, garlic, Parmesan, oil, salt, and pepper to a coarse puree.

2. In a large pot of boiling, salted water, cook the pasta until just done. Drain and reserve 1/2 cup of the pasta water.  Toss the pasta with 1/4 cup of the reserved pasta water, the walnut pesto, and the butter. If the pasta seems dry, add more of the reserved pasta water. Sprinkle with additional Parmesan and pass more at the table. Serves 4 - 6.

Thursday, March 20, 2014

Pantry Pasta


What do you make when your fridge breaks down and you leave town for a week? Nothing. You order in, duh. Or you make the most random pasta ever.

Raw onions can be polarizing, but caramelized onions are ah-maz-ing. Add them to sandwiches, salads, dips, pizza, eggs...Why not make them the main ingredient in a pasta? There's no reason not to. Unless it happens to be the first day of spring and you can actually find something green!


Caramelized Onion Pantry Pasta

2 tablespoons unsalted butter
2 tablespoons extra virgin olive oil
4 medium onions, thinly sliced
Salt and freshly ground black pepper

Pasta 
Toasted pine nuts
Parmesan Cheese

1. Melt the butter and oil in a large skillet over medium heat. Add the onions and ½ teaspoon of salt and cook, stirring occasionally, until soft and translucent, 15 minutes. Reduce the heat to medium-low and continue cooking, stirring occasionally to loosen any onions that may be stuck to the bottom of the pan, until the onions are deep golden brown, about 30 minutes more.  

2. Meanwhile, cook your preferred pasta according to package directions. Drain and add to the skillet, along with a few tablespoons of pasta cooking liquid, and toss with the onions to coat. Add more butter if desired, season to taste, and serve with toasted pine nuts and Parmesan cheese.

Sunday, February 23, 2014

Un-Frozen


I don't know what's up with my apartment, but right after dealing with the lack of heat, my stupid refrigerator died on me! And it's not the first time that this has happened! Of course it died the day after I made two new batches of soup to freeze for future snowstorms. What a waste of time and money and food! At least I got to sample (and photograph) my white bean soup before throwing it down the trash chute. Annoying!

I think the key to this recipe is cooking the base vegetables in bacon fat in order to infuse the soup with the essence of bacon. Then, if you wait to top each bowl with freshly cooked bacon right before serving, you can retain the crispy texture. Bacon!

Even though it has been strangely warm this weekend, I know that another snowstorm has to be lurking just around the corner. So while I am dreaming of enjoying a glass of rosé on a beach somewhere warm, I'll make another batch of soup in anticipation of a potential blizzard, with my fingers crossed that it won't actually happen. The blizzard of course, not the rosé!


White Bean with Bacon Soup
The Ski House Cookbook

5 strips thick-sliced bacon
1 medium yellow onion, diced
1 medium carrot, diced
1 celery rib, diced
1 medium shallot, minced
4 garlic cloves, minced
1 teaspoon chopped fresh thyme
1 bay leaf
2 (15-ounce) cans cannellini or other small white bean, drained
2 1/2 cups low-sodium chicken stock
Salt and freshly ground pepper

Gratuitous bacon shot
1. In a large pot over medium heat, cook the bacon until crisp, about 8 minutes. Remove the bacon to drain on paper towels.

2. Remove all but 2 tablespoons of the bacon fat from the pot. Add the onion, carrot, celery and shallot and cook over moderate heat, stirring occasionally, until the vegetables are softened, about 5 minutes. Add the garlic, thyme and bay leaf and cook until fragrant, about 1 minute. Add the beans and stock and bring to a boil. Reduce the heat and cook the soup over medium heat for about 15 minutes or until the beans begin to fall apart.

3. Discard the bay leaf and puree the soup until smooth with an immersion blender. Season the soup with salt and pepper to taste and transfer to bowls. Crumble or chop the cooked bacon, garnish the soup and serve. Serves 4 - 6.

Friday, January 24, 2014

Cold Comfort

I also use my meat thermometer to read the temp in my apt. It's VERY rare!

When it's 8˚ outside the last thing that I want to do is get up in the dark to go to a 6:30 am spin class. Especially when my apartment is only 55˚ to start with. Thanks landlords! It's super comfy! I think the shivering is helping me to burn extra calories so I don't even have to go to the freaking gym! (Fortunately, because now my gym has no heat or water. Gross.)

Even though I sadly do have to get up supes early to go to the gym and/or work, I'd really rather sleep in and have a snow day like some peeps enjoyed earlier this week. And what I'd love to eat is a giant batch of homemade waffles. (Served to me on a silver platter, thanks.) I'm not talking about the crazy yeasted version that I made here, just your good old-fashioned basic recipe. Mostly I just need a way to consume the six or so bottles worth of maple syrup that I have stashed from purveyors such as Crown in NY,  Gillingham's in VT, and a generic bottle from MI. 

Though I did try, I'm obviously not very good at estimating the amount of batter required to make a full waffle on my waffle iron. The first one didn't have any edges at all. At least my photo below shows improvement. I need help. Who's coming over to cook for me? BTW: BYO space heater.


Quick Waffles
Adapted from Bon Appétit

1 3/4 cups all purpose flour
2 tablespoons sugar
1 1/2 teaspoons baking powder
1/2 teaspoon salt
1 3/4 cups whole milk
2 large eggs
6 tablespoons (3/4 stick) unsalted butter, melted, slightly cooled
Peanut oil

1. Whisk the flour, sugar, baking powder, and 1/2 teaspoon salt in a large bowl to blend. Whisk the whole milk, 2 large eggs, and melted butter in medium bowl to blend. Add the milk mixture to the dry ingredients in a large bowl and whisk until the batter is smooth. DO AHEAD: Can be made 1 hour ahead. Let batter stand at room temperature.

2. Heat the waffle iron according to manufacturer's instructions (medium-high heat). Brush the grids lightly with peanut oil (don't miss any crevices or you waffle may stick like mine did). Pour enough batter onto each waffle grid to cover generously (about heaping 1/2 cup batter for 4 1/2x3 1/2-inch grid); spread evenly with an offset spatula. Close the waffle iron and cook until the waffles are golden brown and crisp on both sides, 5 to 6 minutes.

3. Divide the waffles among 4 plates. Dust with powdered sugar or dollop with unsalted butter or smother with real maple syrup, or do all three. Serves four.

Sunday, January 12, 2014

Frozen


While packing to go away on a trip, I try to also spend the time to empty out my fridge so that I don't return to a science experiment gone terribly wrong. The only problem with this plan is that when I do finally come home, especially if it's later in the evening, the only thing I have left to eat are ice cubes. Yeah, yeah... I could order in, but then I'll just order too much, spend too much, and eat too much.

When I returned from my latest trip just after New Years and rummaged through my freezer to gnaw on some ice cubes, I found a container of lentil soup that I had frozen during Christmas week. I had totally forgotten about it. For me, stocking up for future trips or just the winter to come is key, especially since my apartment has been hovering around 55 degrees so far this winter, incidentally the minimum required by NYC law. Coincidence? Doubt it. Someone's trying to save some dollar bills and it ain't me.

Anyhoo, I decided to make a variation of a lentil soup which I first wrote about here. It's supes quick to make, freezes really well, and is also delicious served over basmati rice. (Check out the recipe below.) I also made a batch of vegetable soup, which I guess you could call minestrone, and even threw in a leftover Parmesan cheese rind. Instead of throwing them away, you can freeze rinds and then add to soups to flavor them. The addition of pasta is optional depending on how you're feeling about carbs after the holidays. One option is to make the soup without the pasta and then add it in when you are reheating the soup, if you have the calories to spare. I don't, but added some anyway. It's still better than ordering (and eating) pad thai.


Minestrone (aka vegetable) Soup

2 tablespoons olive oil
1 medium onion, chopped
2 garlic cloves, minced
2 medium carrots, peeled and diced
1 large celery stalk, diced
Salt and freshly ground black pepper
1 (14.5-ounce) can diced tomatoes
1 medium bunch kale, chopped
1 (15-ounce) can small white beans, rinsed and drained
6 cups broth (vegetable or chicken)
1 (2-inch) piece of parmesan rind
3/4 cup small dried pasta (optional)
Freshly grated Parmesan, for serving

1. In a large pot, heat the oil over medium heat. Add the onion, garlic, carrot, celery, 1 teaspoon salt and 1/4 teaspoon pepper. Cook, stirring occasionally until the vegetables begin to soften, 5 - 8 minutes.

2. Add the tomatoes, kale, beans, broth and Parmesan rind. Bring to a boil. Reduce to a simmer and cook until the vegetables are tender, about 15 minutes. Add the pasta, if using and cook for ten minutes more, or until the pasta is al dente. Discard the cheese rind and season to taste with salt and pepper. Serve sprinkled with Parmesan if desired. Serves 6 - 8.


Curried Lentil Soup

1 tablespoon olive oil
1 medium onion, chopped
1 medium carrot, finely chopped
Salt and freshly ground black pepper
2 large garlic cloves, minced
2 tablespoons (or more) curry powder
1 cup green lentils
4 cups water
Cilantro and lemon wedges, for serving

1. Heat the olive oil in heavy large pot over medium heat. Add the onion and carrot and sprinkle with salt and pepper. Cook until the onion is translucent, stirring occasionally, about 4 minutes. Add the garlic and stir until the vegetables are soft but not brown, about 4 minutes longer. Add the curry powder and stir until fragrant, about 1 minute. 

2. Add the lentils and 4 cups of water. Sprinkle with salt and pepper. Increase the heat to bring to boil. Reduce the heat to medium and simmer until the lentils are tender, about 30 minutes. Pulse briefly with an immersion blender to desired consistency. Top with cilantro and serve with lemon wedges. Serves 6.